Critical Security Update
To help protect your systems, customers using NI driver software 2026 Q2 or earlier should visit ni.com/ni-pal-update and follow the recommended actions.
Declassifying NI LabVIEW Code
Overview
LabVIEW developers create code in a secure, classified area. To move the code to a non-secure area, it must be free of anything classified: code, information, or data. Classified code may include algorithms that perform work considered classified, information used as inputs in the code, and data collected by the application and stored in a file. Before moving the code out of the classified area, it must be reviewed and approved by someone trained to identify classified information and who understands LabVIEW code.
Declassifying LabVIEW code is the same as any programming language:
Develop the code following good documentation practices.
- Perform static code analysis using automated tools to look for certain flags that identify classified code.
Perform manual code review to ensure all sensitive data is removed.
Sanitize any classified information in the code.
Document the classification process, including the tools used, steps taken, and results.
Obtain approval from an approved security officer.
In this paper, we outline the following recommendations and best practices to make declassification of LabVIEW code as simple as possible.
Minimize the amount of code developed in the secure environment
Modularize code to separate classified development from non-classified
Document code clearly to identify classified and non-classified information
Use VI Analyzer to run static analysis on code
Use Print VI to perform manual review of code
Document steps taken
Present results to a trained security officer
Contents
- Minimize the Amount of Code Developed in a Secure Environment
- Modularize Code to Separate Classified Development From Non-Classified
- Document Code Clearly to Identify Classified and Non-Classified Information
- Use VI Analyzer to Run Static Analysis on Code
- Use Print VI to Perform Manual Code Review
- Document Steps Taken
- Present Results to a Trained Security Officer
- Next Steps
Minimize the Amount of Code Developed in a Secure Environment
When working with classified code, it is generally easier to avoid moving code from a classified environment to a non-classified environment. Whenever possible, develop the code in a non-classified environment and then move the completed code into the classified environment. The modular nature of LabVIEW enables this code development using placeholder subVIs defining the inputs and outputs, but leaving the development of sensitive code until the code is inside the classified area. Ideally, the only code changes that happen after the move are to implement the classified parts of the code. However, since this practice is not always feasible, LabVIEW developers who work in classified environments should follow certain best practices as explained in the rest of this document.
Modularize Code to Separate Classified Development From Non-Classified
Using subVIs in LabVIEW provides a method to separate code with classified information. Architect your code so that development of classified code can be isolated to individual subVIs.
When developing code, consider creating a placeholder algorithm in the top-level VI. Define the inputs and outputs of the algorithm before developing the actual algorithm, then create a subVI from the code section, as shown Figure 1.
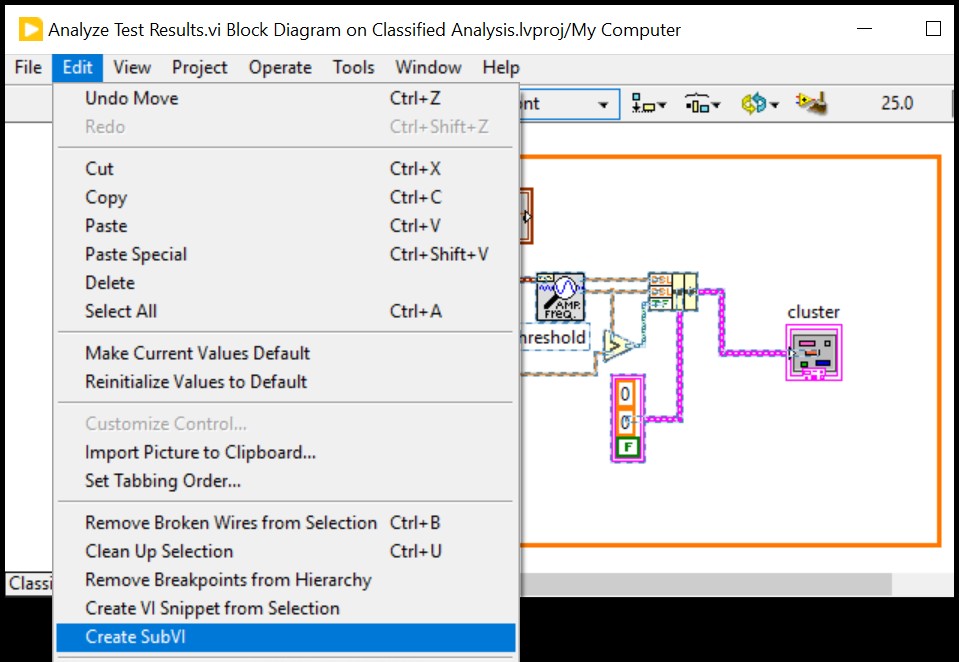
Figure 1. Create SubVI Option in Edit Menu
Once you’ve created the subVI, open it and implement the rest of the algorithm.
Save the subVI. You might save all classified subVIs to a separate folder to make it easier to remove these from the code.
Document Code Clearly to Identify Classified and Non-Classified Information
Documentation is the most important step you can take to simplify the declassification process. If the security officer cannot understand what the code does, they cannot clear it for declassification. LabVIEW offers many levels of documentation options.
Use Labels and Text Boxes to Identify Classified Information
Label every front panel control, indicator, and constant to make the data type and function as obvious as possible. As you label, consider if the data in the control might be classified as data at some point in the future. If it is possible that the data will be classified, use NSA color-coding to identify the potential for classified information.
The image in Figure 2 is from a front panel and identifies that some of the inputs might contain classified information. During the declassification process, this makes it obvious which containers should be checked.
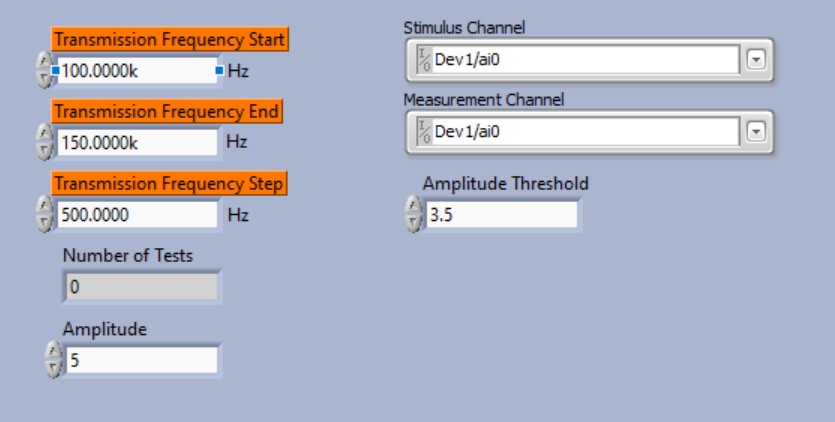
Figure 2. Color-Coded Control Labels
Avoid Putting Classified Information Into Constants
When possible, avoid placing classified information directly into block diagram constants, because constants can be overlooked during the review process. Also, it is harder to remove constants to declassify the code. Instead, consider importing inputs from a data file, and keep classified information in that file. During the declassification process, separate that file from the LabVIEW block diagram, and no classified data will be in the LabVIEW diagram.
This practice is not always possible, so when a constant does contain classified data, it’s important to label that constant, as shown in Figure 3. Color- code the label to identify the data type, following NSA’s color codes.
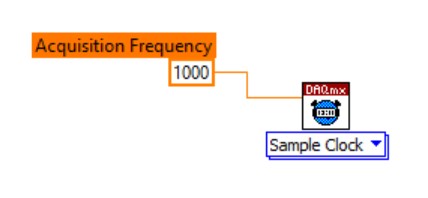
Figure 3. LabVIEW Constant Using Color Coding to Identify Classification
Document SubVIs with Classification Information
LabVIEW code can be documented at the subVI level by opening VI Properties for the subVI by selecting File > VI Properties.
After you open this dialog box, select Documentation from the drop-down menu, as shown in Figure 4.
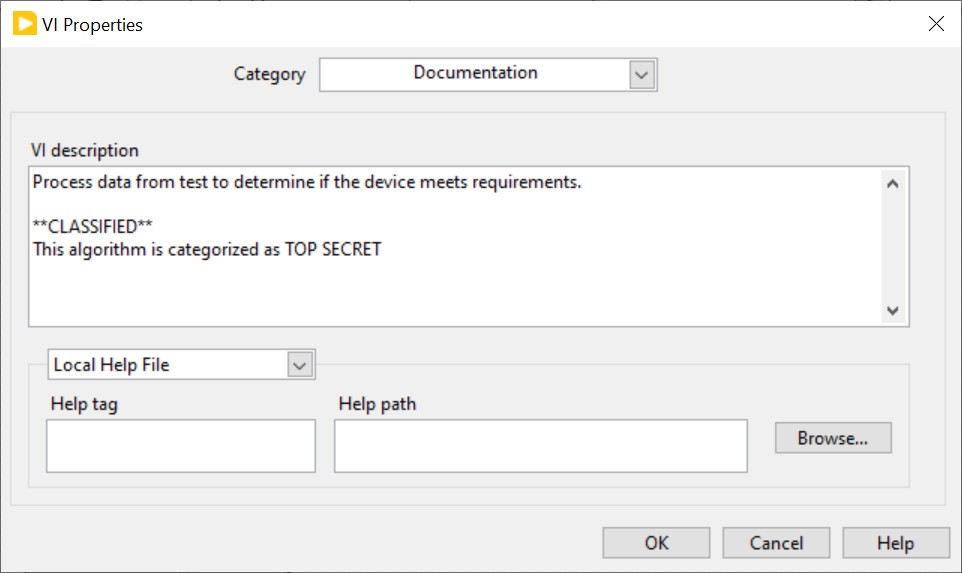
Figure 4. Documenting VIs as Classified in the VI Description Property
Comments in the VI description appear in a few helpful places, but only after they are documented in this dialog box.
It’s also helpful to use a common descriptor for classified subVIs, such as **CLASSIFIED** in the preceding example. You can then use automated tools to search for these comments during the declassification process.
One place the comments appear is in the Context Help Window. When you hover your mouse over the subVI, a description including documentation appears, as shown in Figure 5.
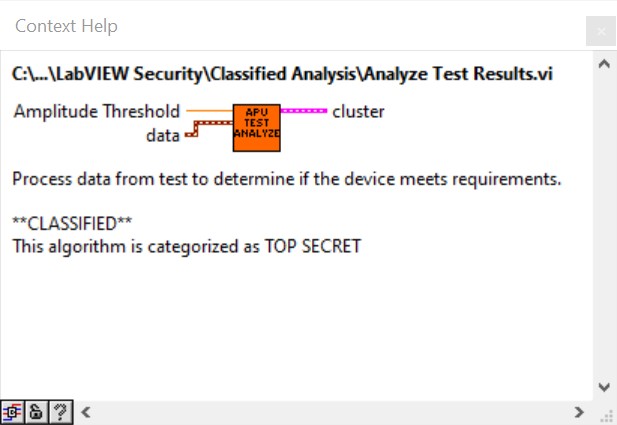
Figure 5. Viewing VI Descriptions in the LabVIEW Context Help Window
Use SubVI Icons to Identify Classified Information
Newly created subVIs display the default icon in the top right corner, as shown in Figure 6.
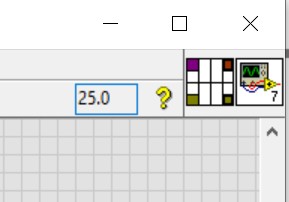
Figure 6. Default Icon for LabVIEW VIs
Double-clicking this icon opens the LabVIEW Icon Editor Dialog Box. This icon editor can be used to identify the function of the subVI. You can also use the color of the icon to quickly identify if the function includes classified data, as shown in Figure 7.
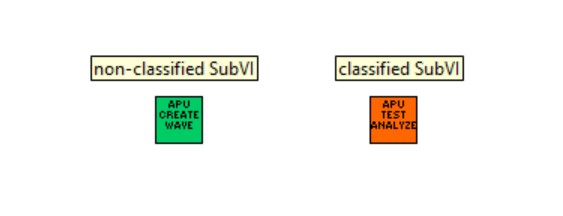
Figure 7. Using Icon Colors to Identify Code Classification
Using colors this way makes it easy to review code during declassification, even if the reviewer is not a LabVIEW programmer.
Use Bookmarks to Identify Code Sections
When you double-click an empty space in the LabVIEW block diagram or front panel, you can create a text bookmark. Including a hashtag (#) before the text makes the text a bookmark.
The automated tools look for these bookmarks. You can specify which bookmarks to look for. It is helpful to have each section of your code tagged as #CLASSIFIED or #UNCLASSIFIED, as depicted in Figure 8. You’ll be able to automate scans for these bookmarks.
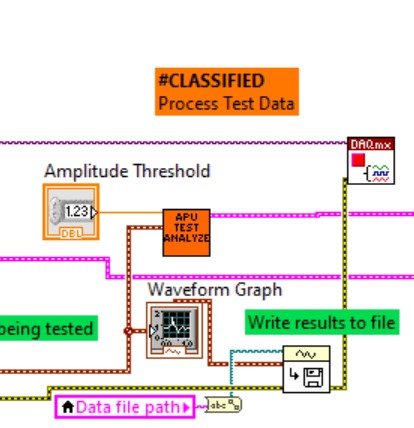
Figure 8. LabVIEW Tags for Classified Code Sections
You can use the Bookmark Manager Window to see all the bookmarks in your code, including subVIs. To launch the Bookmark Manager Window, select View > Bookmark Manager from your LabVIEW front panel.
Figure 9 shows an example of how the Bookmark Manager Window might look for the code shown in this guide.
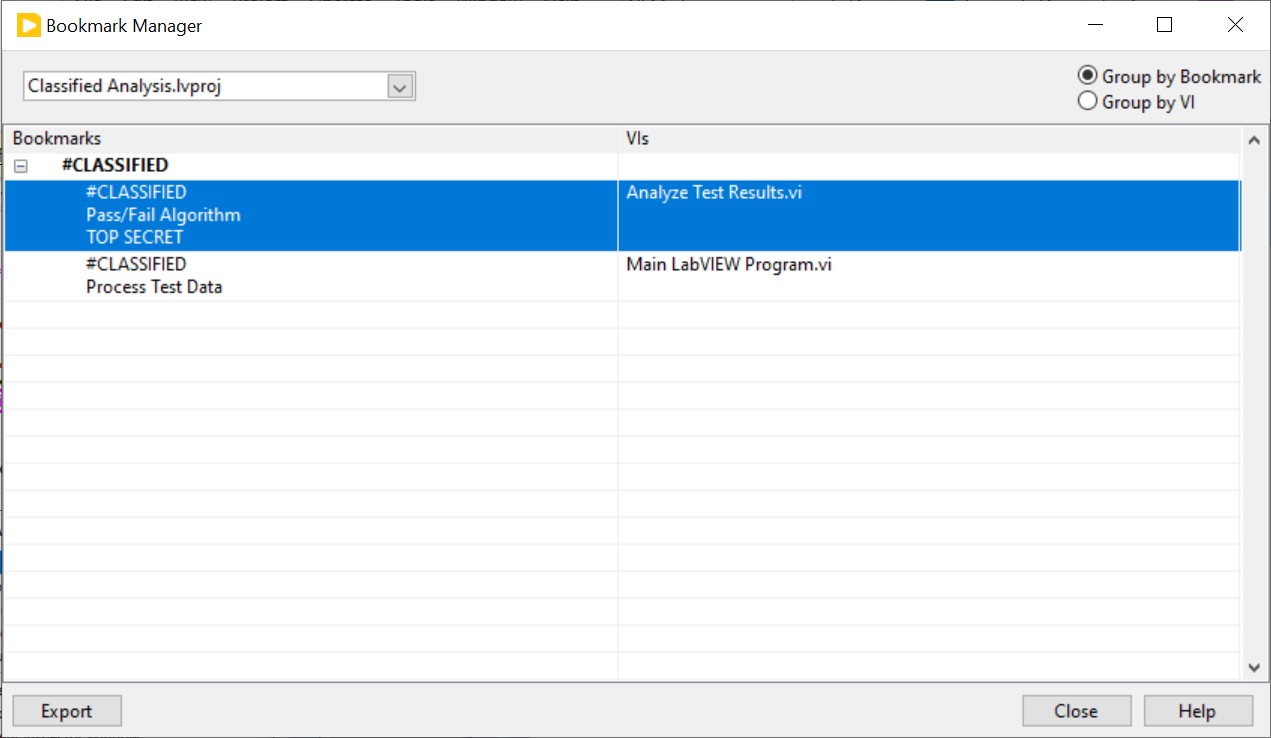
Figure 9. LabVIEW Bookmark Manager
In this window, you can double-click on any tag listed to bring you to that section of code for review. You can also export this list as a text file to show all the classified code sections in your code to your assessor.
The next section discusses how to use VI Analyzer to look for bookmarks in your code.
Use VI Analyzer to Run Static Analysis on Code
VI Analyzer is included with LabVIEW Professional. VI Analyzer automates code review, looking for code issues defined by the reviewer.
- If you don’t see VI Analyzer > Analyze VIs in the Tools menu of your LabVIEW block diagram, install VI Analyzer from NI Package Manager.
- To launch VI Analyzer, start from the top-level VI that you want to review. Select Tools > VI Analyzer > Analyze VIs.
- Select Analyze the Current VI (or other option as appropriate).
- Click Next.
The next screen, shown in Figure 10, provides a way to define which tests are run. You can define a test and select it here from the <User-Specified> tests. VI Analyzer is used primarily for running quality tests on code, so there are many tests here that are not applicable to declassifying data.
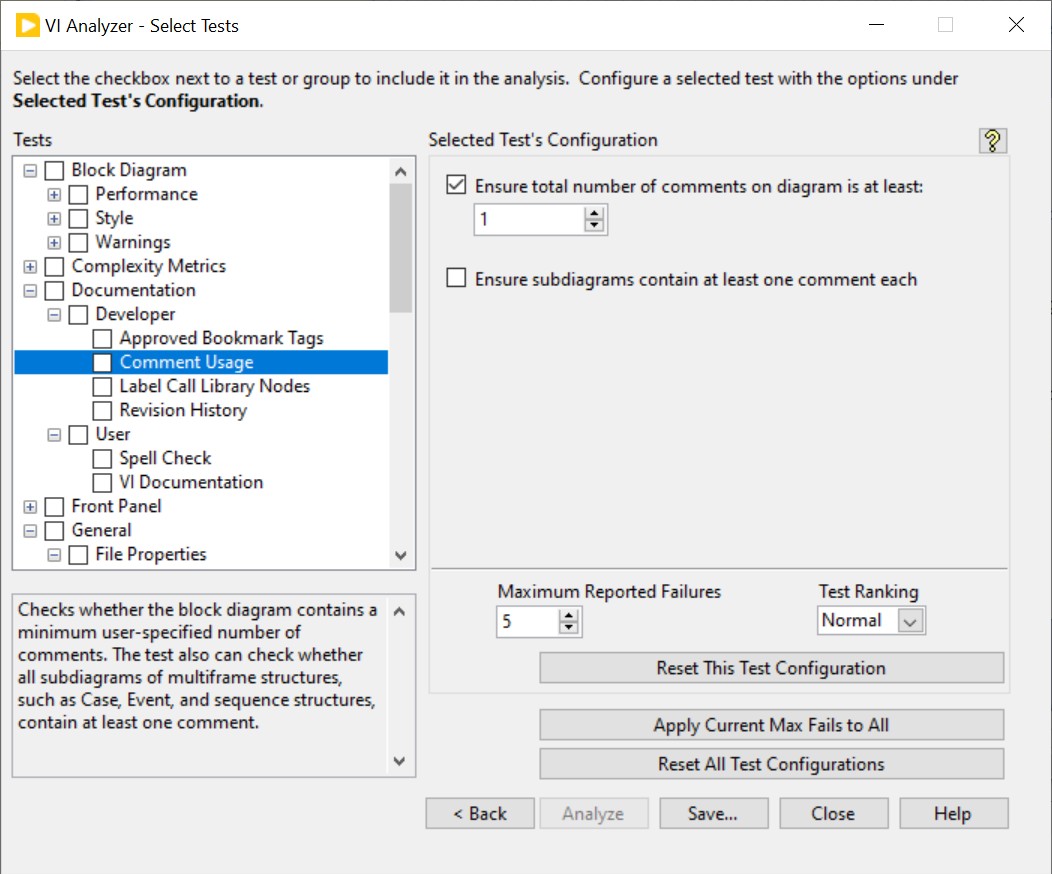
Figure 10. LabVIEW VI Analyzer Window
These are the tests most helpful during the declassification process:
- Approved Bookmark Tags—Look for the use of any non-approved bookmarks.
Documentation > Developer > Comment Usage—Identify VIs that do not have comments.
The first search will return any bookmarks not in the list. By leaving #CLASSIFIED off the list, the search will return a list of all of the sections of code that have this tag. By including #UNCLASSIFIED, as shown in Figure 11, it will ignore the sections of code determined to not be classified.
The second search will identify code segments that have no comments, forcing developers to place bookmarks in each segment prior to the code review.
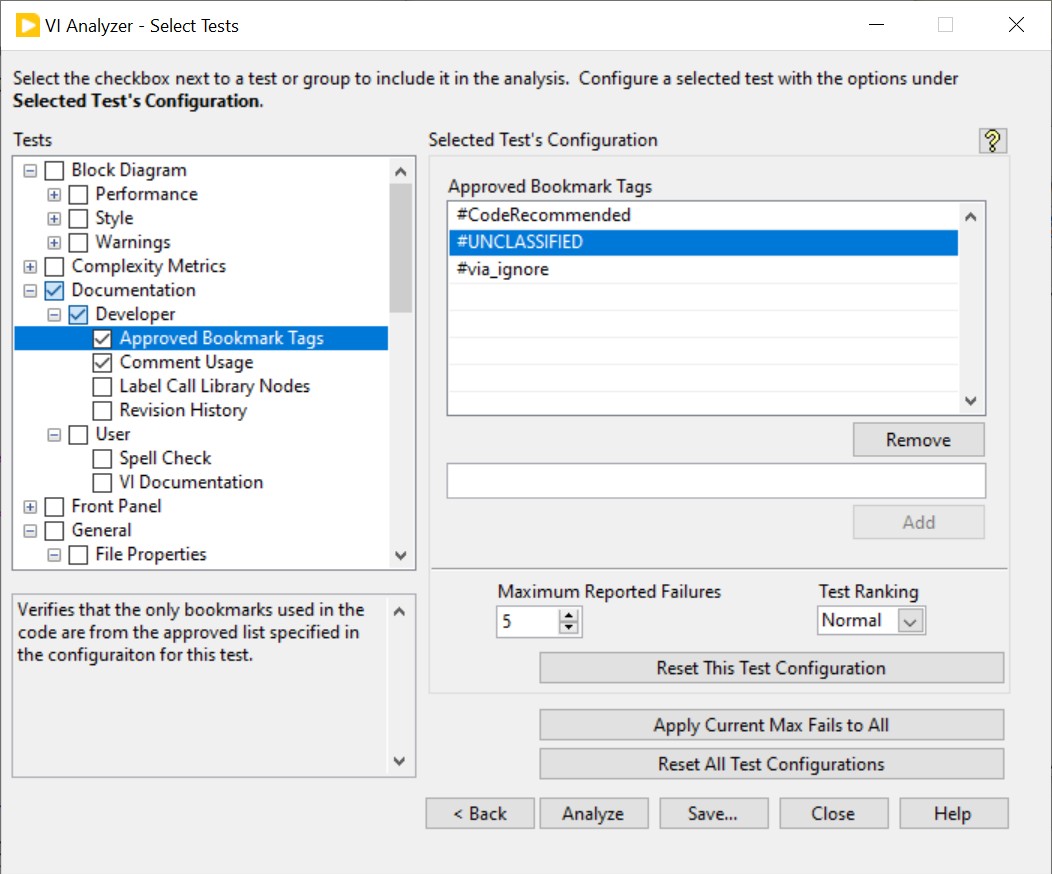
Figure 11. Using VI Analyzer to Omit Approved Bookmark Tags
After you have tuned the tests, click the Save button to reduce the setup time each time you run the tests.
Click Analyze to run the tests. The resulting report will show you #CLASSIFIED bookmarks, as shown in Figure 12.
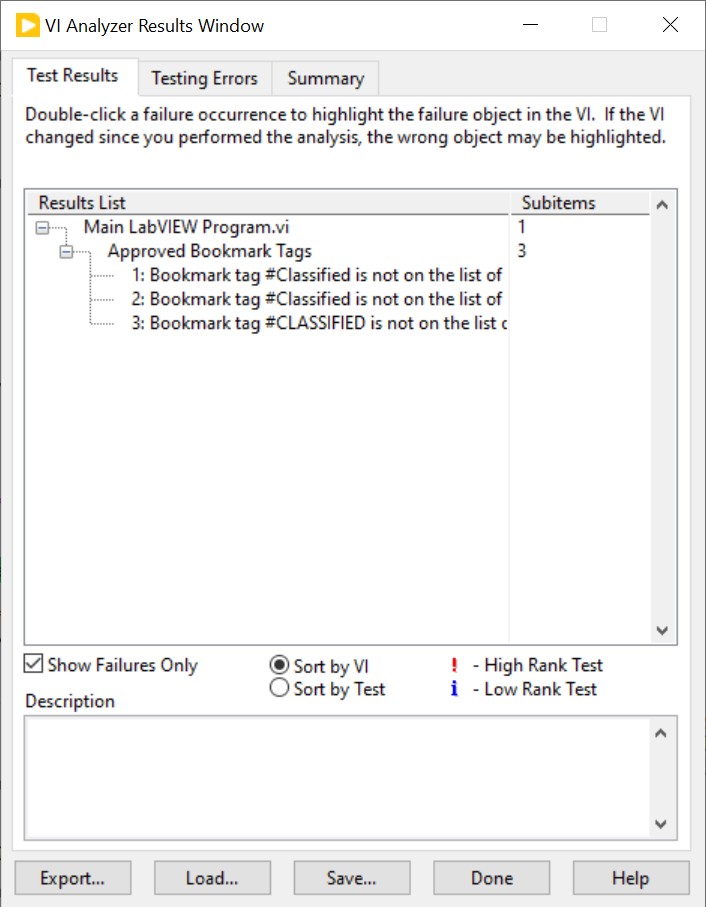
Figure 12. VI Analyzer Results
During the declassification process, save a copy of the VI project and subVIs. Remove the VIs, run this test, and verify that there are no tagged #Classified sections of the code.
Use Print VI to Perform Manual Code Review
After performing the automated review of the code, perform a detailed manual review to ensure that no classified data was missed during the documentation process.
Creating Documentation
- Open the top-level VI in the application, then select File > Print.
- Select the main VI you want to print.
- Click Next.
- VI Documentation and click Next.
- Configure the print options to return the full documentation by selecting Complete from the VI Documentation Style menu.
- Click Next.
- Select the output. For simplicity, select Rich Text Format (RTF). This option generates a file with images that can be opened in Microsoft Word.
- Next.
- Specify the Color Depth (256 colors is usually fine).
- Click Save.
- Select a location, and the file will be generated.
Open the file using a standard document tool like Microsoft Word. This file will contain all the information about the VI, including screenshots. Notice the images will be larger than the page and may appear to be cut off, but the sizes can be reduced to fit on the page.
Notice that all of your subVI documentation will appear. With this documentation, your security officer can review the code for declassification. Using the NSA classification colors will make it immediately clear which sections of the code contain classified information.
In a declassification process, it’s best to save the VIs to a new location, remove all the classified sections, then run this process. If done correctly, nothing marked as classified should be left in the code.
Document Steps Taken
In any security process, documentation is key. Documentation is critical to convince the security officer that you followed steps to protect the information in a classified environment. Documentation can also streamline the process so that you follow a process approved by the security officer, and the security officer understands the steps you’ve taken. Be as detailed as possible when describing the process you follow to protect the information.
Present Results to a Trained Security Officer
If you’ve taken the steps we’ve listed, you can approach your security officer with confidence that you are protecting classified information from leaving a secure area. Using good coding practices, creating complete documentation, and using code review tools will help you demonstrate that you’ve done the work necessary to protect classified information.