Creating and Using Pin Maps
- Updated2026-07-23
- 3 minute(s) read
A pin map allows you to define how DUT (device under test) pins and sites connect to instruments and instrument channels. A single pin map can support multiple instrument types and multiple sites, enabling you to test at scale.
Measurement Plug-Ins supports pin maps and uses information from a pin map file to initialize and manage NI driver sessions.
Use InstrumentStudio to create or edit a pin map. InstrumentStudio provides a graphical experience for creating and editing pin maps, which are implemented in XML.
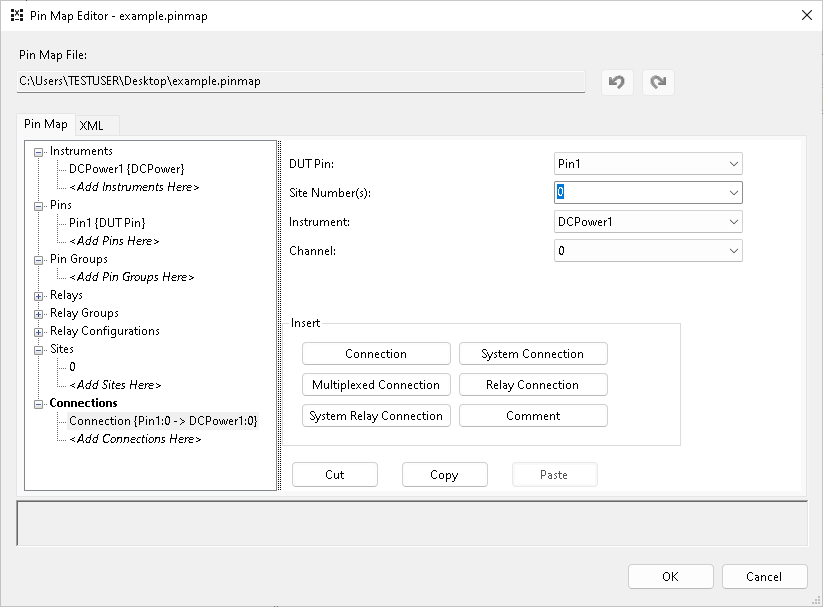
For more information, see Setting an Active Project Pin Map in InstrumentStudio User Manual.
Using Pin Maps with Measurements
A pin map is optional for some measurements and required for others. When a measurement uses pin names instead of physical device resources, the measurement uses the pin map to associate those pin names with instrument channels.
Pin-aware measurements use pin maps in the following ways:
- Associate measurements with pin names instead of software channels.
- Map DUT connections to physical instrument resources.
- Initialize and manage NI driver sessions.
- Use the same pin map across supported applications, including InstrumentStudio, TestStand, and FlexLogger.
If a measurement requires a pin map, ensure that the appropriate pin map is available and configured before running the measurement.
Managing Pin Map Files
NI recommends saving all related files for each DUT you will test within the same folder. The folder should contain your InstrumentStudio project, the pin map for the DUT, TestStand files, and any other files you will use to test and measure the DUT.
Before You Use a Pin Map for Measurements
Before you can use a pin-aware measurement, ensure that the required pin map is configured and available to the application that runs the measurement. For more information about accessing pin maps in measurement logic, see Accessing Pin Maps in Measurement Logic.
Using Pin Maps for Session Management
Pin maps contain information about connected instruments. The session management service uses information from a pin map to determine the associated driver for NI hardware. You can use the session management service to initialize and manage driver sessions based on the information stored in a pin map.
Releases of LabVIEW and Python that include measurement plug-ins provide example measurements that demonstrate session management and pin map workflows. Many examples include pin map registration and session handling.
Registering a Pin Map in TestStand
Some pin-aware measurements require a pin map. In TestStand, register the pin map before running the sequence.
- Double-click Update Pin Map in the Insertion Palette. An Update Pin Map step is added to the sequence.
- Register the pin map in the ProcessSetup sequence callback or use a separate Setup step group. Avoid registering a pin map within the Main sequence.
- Select the Update Pin Map step.
- Select the Update Pin Map tab.
- Specify the Pin Map Path. Type the path directly or click Browse to select the pin map file.
Once you have registered a pin map, you can configure a sequence to initialize and close driver sessions for use with measurements. For more information, see Using Driver Sessions in TestStand.
Some measurement plug-ins examples include ProcessSetup and ProcessCleanup callbacks to demonstrate pin map registration and session handling. Open an example sequence file in TestStand and select to examine these callbacks.
Related Information
- Running a Measurement from InstrumentStudio
Run a measurement from InstrumentStudio with measurement plug-ins.
- Running a Measurement from TestStand
Run a measurement from TestStand with measurement plug-ins.
- Running a Measurement from FlexLogger
Run a measurement from FlexLogger with measurement plug-ins.
- Using Driver Sessions in TestStand
The session management service manages instrument driver sessions that are associated with the pin map. Because this action relies on the pin map, you must first register your pin map with the pin map service.
- Understanding Measurement Plug-In Execution
Information about executing measurement logic and returning measurement data with measurement plug-ins.
- Understanding the Driver Session Management Service
Driver session management, session access control, and pin map integration for supported NI driver software.
- Understanding the Pin Map Service
The Measurement Plug-Ins pin map service retrieves information from a registered pin map. The pin map service can retrieve lists of pins, pin groups, or relays; session or resource names; or instrument channels for a pin.
- Setting an Active Project Pin Map
- Applying a Pin Filter
- Pin Map File XML Structure (TSM)