Generate NI LabWindows™/CVI™ Function Panels from Header Files
Overview
By using header file tags, you can speed up the process of creating function panels, while realizing the benefits of functions panels such as the ability to easily generate and test function calls within LabWindows/CVI and execute these functions immediately in the Interactive Execution window.
This tutorial offers a detailed look at various header file (.h) tags, including example use cases.
Contents
- Function Panel Generation
- Adding Hierarchy with Classes
- Correcting Function Names
- Adding Custom Data Types
- Creating Ring, Slider and Binary Switch Controls
- Declaring Output Parameters
- Defining Default Values for Parameters
- Changing Parameter Types
- Using SetAttribute and GetAttribute Functions
- Using Variable Arguments
- Customizing Parameters
- Adding Help
- Related Links
Function Panel Generation
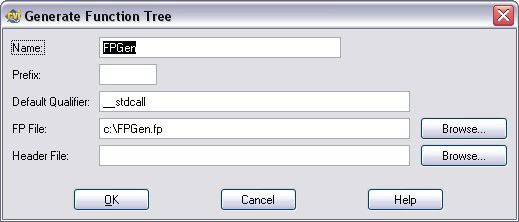
If you open a header/include (.h) file in LabWindows/CVI, you can generate a function panel using the Options»Generation Function Tree command. In order to clearly define the function tree structure, you should use header file tags. On the other hand, if you generate function panels from a header file that does not include header file tags, all function panels will be located in the root of the instrument tree and all parameters will be created as inputs.
Figure 1: Generate Function Tree Dialog
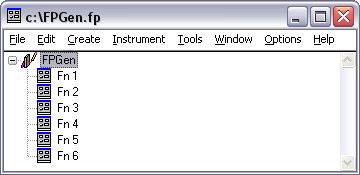
For example, if you generate a function panel from the following header file, the resulting function panel (.fp) file will look like Figure 2. Notice the flat structure of the function panel tree.
int __stdcall fn1(int a);
int __stdcall fn2(int b);
int __stdcall fn3(int a, int b);
float __stdcall fn4(float a);
float __stdcall fn5(float b);
float __stdcall fn6(float a, float b);
Figure 2: Generated Function Panel from Header File without Tags
Note: The default qualifier field in the Generate Function Tree dialog must be consistent with the default qualifier used in the source header file.
By using header file tags, identified by /// keywords, you have the flexibility to:
- organize functions
- adjust names of functions
- change parameter control types and names
- add parameter customization
- display default values
- add help to functions, parameters and classes
- and much more.
Adding Hierarchy with Classes
First, you can use classes to create hierarchy in an .fp file. The following tag identifies the start of a class:
/// -> Class Name
The following tag marks the end of a class:
/// <- Class Name
Note: The class name for this tag is optional and helps to make the code more readable. The -> and <- tags can also be nested.
Example
/// -> Integers
int __stdcall fn1(int a);
int __stdcall fn2(int b);
int __stdcall fn3(int a, int b);
/// <- Integers
/// -> Floats
float __stdcall fn4(float a);
float __stdcall fn5(float b);
float __stdcall fn6(float a, float b);
/// <- Floats
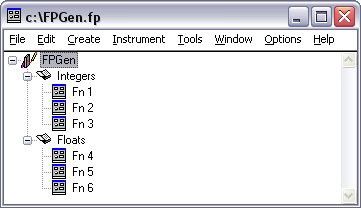
Figure 3 shows the resulting function panels generated from the above code.
Figure 3: Generated Function Panels with -> tags
Correcting Function Names
In order to create a consistent style across auto generated function panels, LabWindows/CVI performs the following actions for each function panel it creates:
- Remove the function prefix
- Capitalizes the first letter
- Inserts a space before each first capital letter or digit in a group of capitals or digits. For example Set6100SensorRpms becomes Set 6100 Sensor Rpms
Because of the automatic word splitting mechanism, the generated function panel name might be different from the intended name. To correct the generated function panel titles, use the XCHG tag. You may also specify multiple replacement string pairs separated by commas.
Note: You may also use the PXCH tag to replace strings in function panel controls.
Example
/// XCHG Fn/Function
/// -> Integers
int __stdcall fn1(int a);
int __stdcall fn2(int b);
int __stdcall fn3(int a, int b);
/// <- Integers
/// -> Floats
float __stdcall fn4(float a);
float __stdcall fn5(float b);
float __stdcall fn6(float a, float b);
/// <- Floats
/// XCHG
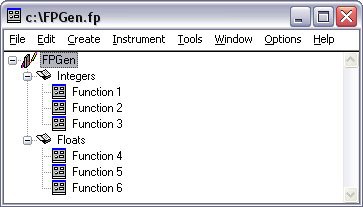
Figure 4 shows the function panel generated from the above code.
Figure 4: Generated Function Panels with XCHG tags
Adding Custom Data Types
Because the function panel generator is not based on a compiler and does not parse data types defined in header files, any use of a non-ANSI data type will generate a syntax error. To correct this, use the ADDT tag to make the generator aware of any custom data types you intend to use in the header file.
Example
/// ADDT int8
 /// ADDT uInt8
The generator will add the type name to the function panels plus some derived array and pointer types.
int8 | uInt8 |
Creating Ring, Slider and Binary Switch Controls
By default, the function panel generator creates input controls. On the other hand, if the generator detects an enum type, it automatically creates a ring control for that parameter, but you have the flexibility to create controls of other types by using the RNG, SLD and BIN tags.
Each tag requires two parameters, separated by a slash. The first parameter is the parameter position ( 1-based index) and the second parameter is optional and can represent the enum name, if the function parameter data type is of type enum.
Note: The BIN tag can only be associated with an enum that has exactly two values.
Example
typedef enum {
ON=1,
OFF=0,
} MyBinaryEnumType;
/// BIN 1
int __stdcall fnX(MyBinaryEnumType binaryInput);
Figure 5: Binary Control
If you want to use a set of values that are defined using the #define preprocessor command, you can group them into a named enum by using the ENUM tag.
Note: The group of #define values must be followed by an empty line in order for the generator to recognize the end of the enum.
Example
/// ENUM enum1
#define ON 1
#define OFF 0
/// ENUM enum2
#define ONE 1
#define TWO 2
#define THREE 3
#define FOUR 4
/// BIN 1/enum1
/// SLD 2/enum2,3/enum2
/// RNG 4/enum2,5/enum2
int __stdcall fnX(int a, int b, int c, int d, int e);
Figure 6 shows the controls generated from the above code.
Figure 6: Generated Controls Using BIN, SLD, and RNG Tags
In the event that you need to add an extra default value to an existing enum, use the EHDV tag for a slider or binary control. The generator will add an extra value at the top of the value list, the label will read "Default", and the control will be set to the value specified.
Example
typedef enum {
kLeftAligned=0,
kRightAlighed=1,
} AlignmentEnumType;
 /// SLD 1

 /// EHDV 1/-1

 int __stdcall fnX(AlignmentEnumType alignment);
Figure 7 shows the control generated by the above code.
Figure 7: Generated Control Using EHDV Tag
If you wish to create different value labels for ring, binary, or slider controls, you can do so by adding comments to each enum value. The generator will replace the enum value names with the commented text.
Note: Avoid using semicolons in the enum comments.
Example
typedef enum {
kLeftAligned= 0, // Left aligned
kRightAlighed=1, // Right aligned
} AlignmentEnumType;
/// SLD 1
/// EHDV 1/-1
int __stdcall fnX(AlignmentEnumType alignment);
Figure 8 shows the control generated by the above code.
Figure 8: Using Comments with the SLD Tag
Declaring Output Parameters
In order to define output parameters, use the OUT tag. Note that only pointers and arrays may be output parameters. Any other data type will generate an error.
Example
/// OUT 2,3
int __stdcall Sphere_Calc(float radius, float *surface, float *volume);
Figure 9 shows what is generated from the above code.
Figure 9: Generated Controls Using the OUT Tag
Defining Default Values for Parameters
The function panel generator creates empty input and output parameters and sets all ring, binary or slider parameters to their first item, but if you need to change the default value of a parameter, use the DFLT tag.
Example
/// OUT 2,3
/// DFLT 1/1.0,2/&surface,3/&volume
int __stdcall Sphere_Calc(float radius, float *surface, float *volume);
Figure 10 shows the generated controls for the above code.
Figure 10: Controls Generated with DFLT Tag
Changing Parameter Types
If you need to use a specific parameter type on a function panel, use the PTYP tag to change it from the ANSI-C data type to any other type that is valid on the function panel. For example, a function parameter, declared as void* but is used for numeric arrays, can be changed from void* to LabWindows/CVI's native Numeric Array.
Example
/// PTYP 1/Numeric Array
float __stdcall CalcArrayMean(void *array, int dataType);
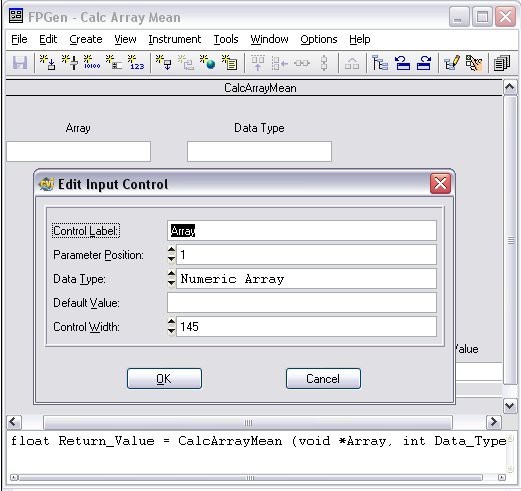
Figure 11 shows the generated controls from the above code.
Figure 11: Generated Controls Using PTYP Tag
Using SetAttribute and GetAttribute Functions
.SUB files are often used in IVI drivers to specific instrument attributes. If your instrument requires SetAttribute or GetAttribute functions whose attributes are stored in a .SUB file, use the ERNG tag for the attribute parameter and the PTYP tag for the value parameter. For the attribute parameter, the generator will create an empty ring, however when the instrument is loaded, the contents of the ring parameter will be filled with attributes from the .SUB file. For the value parameter, the generator will change the parameter type from void* to LabWindows/CVI's native Any Type.
Note: The structure of .sub files can be found in Chapter 7 of the Instrument Driver Interactive Developer Interface Specification.
Example
/// ERNG 1
/// PTYP 2/Any Type
/// OUT 2
int __stdcall GetAttribute(int attribute, void *value);
Note:.SUB files must be located in the same folder as their associated .fp file and have a common root name.
For this example, we will use the attached FPGen.sub file to populate the instrument attributes. After generating the function panel, open the GetAttribute function and select Options»Operate Function Panel (F9). Figure 12 shows the controls generated from the above code.
Figure 12: Generated Controls Using ERNG Tag
Using Variable Arguments
In some cases, you may need to use variable arguments in a function declaration. So if you need additional parameter controls on the function panel, you can add them using the VARG tag.
Example
/// VARG int/More Numbers Ending With Zero
int __stdcall Sum(int number, ...);
Figure 13 shows the controls generated from the above code.
Figure 13: Generated Controls Using VARG Tag
When using a function panel with variable arguments, you can type the first number in the first input control and the rest of the numbers, separated by commas and followed by a zero, in the second control. The resulting function call will look like:
Sum(1, 2, 3, 4, 5, 0);
Figure 14: Generated Controls with Sequence
Customizing Parameters
Additional customizations can be added to function panel parameters. Customizations are indicated by a "..." button to the right of the parameter control. To customize a parameter, use the CUST tag. Specify the parameter position, the DLL that contains the desired customization function and the entry point name. More help on creating customization functions and DLLs can be found in the LabWindows/CVI Help.
Note: The customization DLL must be in the system path or in the same folder where the instrument resides in order for the DLL to be found. You may also use relative or absolute path in the DLL specification.
Example
/// CUST 1/cviLibCust.dll/SelectAnyFile
int __stdcall SaveDataToFile(char filePath[], void *data);
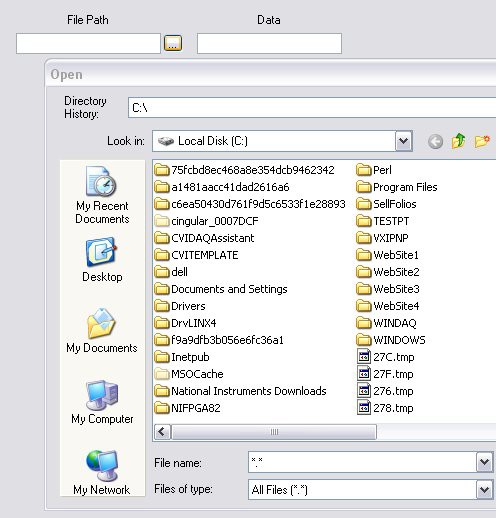
For this example, we will used the attached cviLibCust.dll file. After generating the function panel, open the SaveDatatoFile function and select Options»Operate Function Panel (F9). If you now click on the customization button (or press Enter with the cursor inside the parameter), an Open File dialog will appear as shown in figure 15.
Figure 15: Customizing Parameters
Adding Help
Finally, to document your function panels, you can add help for the instrument, help for each class, help for each function and even help for each parameter with the HFP, HCL, HFUN, HPAR and HRET tags. You can also add the help as either formatted text of HTML, but the help contents need to be saved in a file. Each filename can be associated with one or more help generation tags.
Example
/// HFP FPfileHelp.htm
/// HCL IntegerClassHelp.htm
/// -> Integers
/// HFUN Fn1Help.htm
/// HPAR 1/ParameterAHelp.htm
int __stdcall fn1(int a);
/// HFUN Fn2Help.htm
/// HPAR 1/ParameterBHelp.htm
int __stdcall fn2(int b);
/// HFUN Fn3Help.htm
/// HPAR 1/ParameterAHelp.htm,2/ParameterBHelp.htm
int __stdcall fn3(int a, int b);
/// <- Integers
Note: The HTML files used in this example are attached below for your reference.
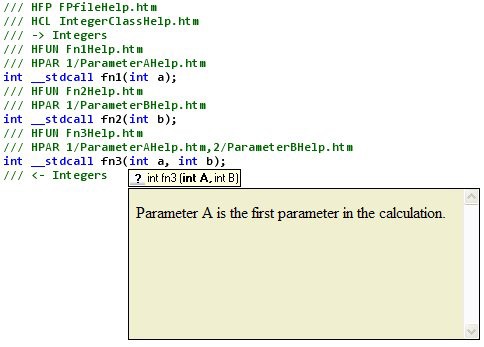
After generating your function panel file, you can position the cursor at the first parameter of function fn3 and select menu Edit » Show Prototype (or press Ctrl+Shift+Space) and the function prototype will display in a tooltip.
You can bring up the parameter help by clicking on the question mark button (or pressing F1).
Figure 16: HTML Function Help
Related Links
The proven LabWindows/CVI development environment can make your ANSI C application development more productive with various documentation tools, including source code tags, the ability to generate function panels from headers files, and the ability to generate HTML documentation from function panels.
