Remote Application Development for Windows-based CompactRIO
Overview
The following document describes the process for remote development, debugging and deployment of an application intended to run on the Windows Embedded Standard 7 (WES7) operating system on a CompactRIO, specifically the cRIO 9081 or the cRIO 9082. Since this process is significantly different from remote development for CompactRIOs with real-time operating systems, it is recommended that you first consider Local Application Development on Windows based CompactRIO. With local development, you install the LabVIEW development tools on the CompactRIO target with a remote FPGA compilation server.
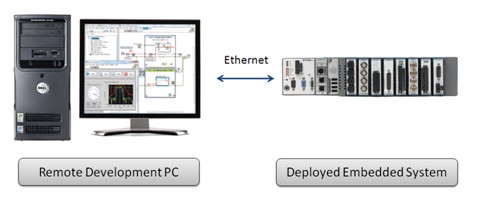
With remote development for CompactRIO, you use a PC with LabVIEW installed to create an application and then deploy the application across the network to the CompactRIO embedded system.
If developing on the deployment target is not feasible for your application, use this document to learn the process for remote development for Windows based CompactRIO targets. Once you configure your target, there are three development steps:
- Managing Targets in the LabVIEW Project Explorer
- Debugging Your Windows and FPGA VIs
- Executing Your VIs on the CompactRIO
To help you learn this different process, this document will step you through how to configure your system, the development process, and the deployment options. See the linked documents for additional information and clarification on any of the processes described in this tutorial.
To learn more about Windows-based CompactRIO applications, refer to Getting Started with CompactRIO Hardware and LabVIEW.
Contents
Initial Configuration
The following section discusses how to configure your development computer and cRIO-9081 or 9082 for remote development, assuming you have chosen the Windows based CompactRIO.
Note: If you have selected to have only the Real-Time operating system running on your CompactRIO, please refer to Getting Started Guide for CompactRIO for further software and setup information.
Development Computer Configuration
Since the Windows Embedded Standard 7 (WES7) operating system replaces the Real-Time operating system found on other CompactRIO targets, the LabVIEW Real-Time module is not required to create applications for these targets. On the remote development system,you will need to install the LabVIEW Development System, the LabVIEW FPGA Module and Xilinx Compile Tools. In addition to this software, the NI-RIO driver needs to be installed on your development PC to support the CompactRIO hardware and C Series modules.
Note: The cRIO-9081 and cRIO-9082 hardware targets are only supported with LabVIEW 2011 or later, so ensure that the following software is installed on your development computer:
- LabVIEW 2011 Development System or later
- LabVIEW 2011 FPGA Module or later
- Xilinx Compile Tools Version 12.4 or later
- NI-RIO 4.0 or later
Although you can install each of these software components separately, the easiest way to install them is using the LabVIEW Platform DVD. If you are not using the LabVIEW Platform DVD, you should download and install the software in the order listed above from ni.com/downloads.
CompactRIO Configuration
Software Installation
Once you have the necessary software installed on your remote development computer, you can configure your CompactRIO. To run your application, similar to any Windows-based LabVIEW application, Windows needs the LabVIEW Run-Time Engine to be installed. Be sure to install the same version of the Run-Time Engine as the LabVIEW Development System used on the development machine (e.g. if the application was written in LabVIEW 2011, make sure to install LabVIEW Run-Time Engine 2011). You will also need the NI-RIO driver installed locally on the CompactRIO target to interact with the I/O. Therefore, the following software is required on your Windows based CompactRIO:
- LabVIEW Run-Time Engine
- NI-RIO 4.0 or later
- Any additional drivers required for your application
Note: You should install the software in the order listed above. Any other drivers used in development of your application should also be installed on the CompactRIO, but should be installed after the Run-Time Engine.
There are several methods for installing software onto your CompactRIO:
- Install the software from disks: Since the target has no attached optical drive, an external USB drive is needed to install software from a disk.
- Use a USB drive: Copy the software installers from your development machine or the LabVIEW Platform DVD to a USB flash drive, then plug the USB into one of the ports on the CompactRIO, and run the installers.
- Network Installation: If you have the NI installers located on a shared network drive you can connect your CompactRIO to the network and then download and install the software directly.
Enabling RIO Server for Remote FPGA Development
To remotely target the FPGA on board the CompactRIO from your development machine, the NI-RIO Server Windows service needs to be started and added as an exception in the firewall.
1. To do this, open and run NI MAX (Measurement and Automation Explorer) as Administrator and manually start the NI-RIO Service Windows service on the My System page, as shown below. Then set Startup Type to Automatic.
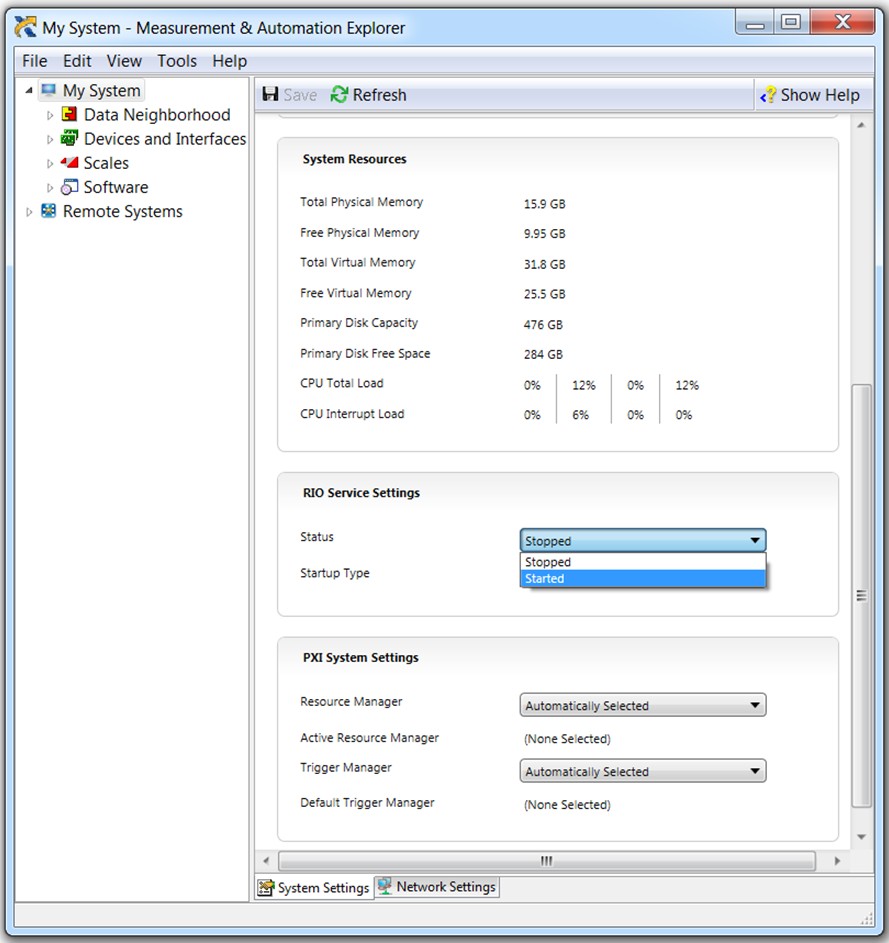
2. Also ensure that LabVIEW Project Access in the Startup Settings section contains a checkmark and that the Run-Time Engine Version matches the version and bitness of the LabVIEW Development System on the host computer.
3. Save all changes.
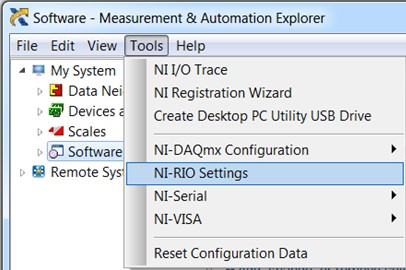
4. Add an exception for the Windows\System32\NiRioRpc.exe in the Windows firewall.
5. For step-by-step instructions on this process, within NI MAX go to Tools»NI-RIO Settings.
Application Development
Once you have configured your system, you are ready to develop your application. As mentioned in the tutorial overview, there are three main differences between remotely developing an application for Windows as compared to real-time CompactRIO targets:
- Managing Targets in the LabVIEW Project Explorer
- Debugging Your Windows and FPGA VIs
- Executing Your VIs on the CompactRIO
Managing Targets in the LabVIEW Project Explorer
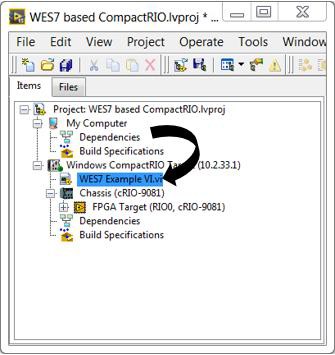
As you can see in the image below, in contrast to the Project Explorer for a real-time CompactRIO, when developing for the Windows-based CompactRIO the host and FPGA applications will be located under different targets. In the LabVIEW project you develop a remote Windows application first on your development computer target for initial functional debugging and then deploy it later in the development to the remote target for final debugging and verification. This development practice extends to Windows-based CompactRIO targets. By developing and executing the Windows portion of your CompactRIO application on your development machine, you have access to all the standard LabVIEW Debugging Tools and the LabVIEW Profile Performance and Memory Window.
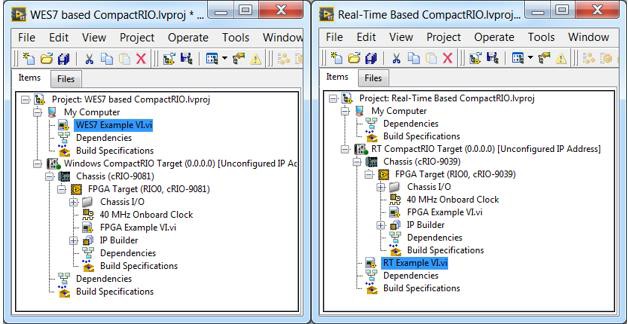
In contrast to Real-Time based CompactRIO, for Windows-based CompactRIO you develop your Windows host application under My Computer and develop your FPGA VI under a separate Windows CompactRIO Target .
However, targeting My Computer for your Windows VI does not inherently provide access your CompactRIO I/O and peripherals. To add access to your FPGA target and C Series I/O modules, you need to add the CompactRIO as a Networked Computer/Device. To add the FPGA target to your LabVIEW project, follow these steps:
- Right-click on the project title and select New»Targets and Devices...
- In the dialog box that appears select the New target or device radio button
- Select Windows CompactRIO»cRIO-9081/cRIO-9082 and click OK

To remotely develop, debug, and deploy to the FPGA target on the WES-based CompactRIO you need to add a Windows CompactRIO to your LabVIEW project.
- Back in the Project Explorer window, right-click on the Windows CompactRIO you just added and select Properties.
- In the properties dialog set the IP address to that of your Windows based CompactRIO and select OK. To look up the IP address of your CompactRIO, attach a monitor, mouse, and keyboard to the target and follow the steps outlined in the How to determine the TCP/IP address Microsoft support document.
- Right-click on the Chassis underneath your Windows CompactRIO Target and select New»FPGA Target.
Note: If the FPGA target does not appear, reference the Enabling RIO Server for Remote FPGA Development section of the document and verify that you have completed the steps.
- Allow LabVIEW to scan the I/O modules in your chassis to populate them in your project under the FPGA target.
Now you can access the FPGA target through the Host Interface Palette API from your Windows-based VI.
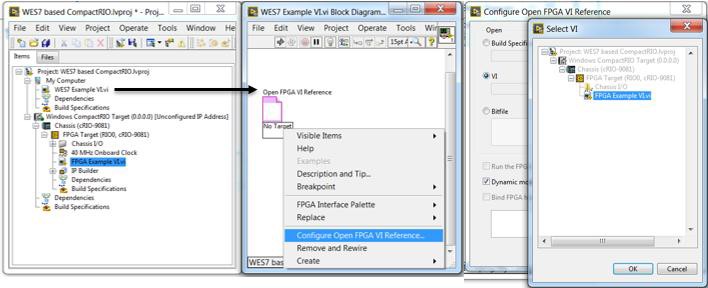
To communicate between the host and the FPGA VI you use the same FPGA Open VI Reference you normally would use for other RIO applications, except the FPGA VI is under the CompactRIO project target.
Debugging Your Windows and FPGA VIs
For your Windows VI, prior to deployment to the target, you have access to all the standard LabVIEW Debugging Tools and the LabVIEW Profile Performance and Memory Window. If you want to use the debugging tools while the application is executing on the CompactRIO, you can enable debugging when building the application. It should be noted that remote debugging only works when there is a network connection between the CompactRIO and your development machine as described in the Initial Configuration section of this document. For more information, please see Debugging Applications and Shared Libraries.
The development, debugging and deployment process for the LabVIEW FPGA VI in your Windows based CompactRIO project is identical to that for other CompactRIO targets. You can develop using the simulation tools to functionally verify your design, and debug your VI. To deploy your FPGA click the Run button or create an FPGA Build Specification to start an FPGA compilation. Once the compilation is complete the bitfile will be deployed to the FPGA on the CompactRIO across the network. In addition, once deployed the FPGA interactive front panel will update with values.
Reference the Testing and Debugging LabVIEW FPGA Code tutorial for more information on general best practices for LabVIEW FPGA development.
Executing Your VIs on the CompactRIO
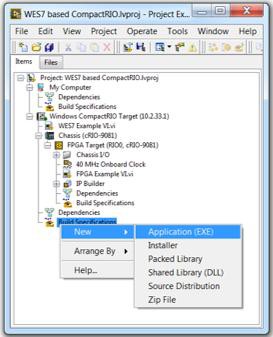
To execute your VI on the target, drag the VI file in your project from My Computer to beneath your Windows CompactRIO Target, as shown below.
Then press the Run Arrow on your VI. You can view the front panel of a VI running on the WES 7 target if you connect a monitor to the target. The front panel on the target monitor mirrors the front panel on the host computer. For more information on connecting to your target from your host computer and controlling the Front Panel, read Running VIs on Windows Embedded Standard Targets. This process assumes you're connected to your target over Ethernet.
Deployment Options
Once you've completed your application development, you should decide how you want to deploy your final application. You can create an executable or installer in the LabVIEW project by creating a build specification as you would for any other Windows application. Then you can deploy the application to the target either from the LabVIEW project (recommended), or direct deployment via USB flash drive.
Creating a Build Specification
- Follow traditional development steps until you have an application you want to execute on the Windows-based CompactRIO target. At this point, rather than click the run button to deploy to the remote target, you will add your VIs to a build specification. A build specification contains all the settings for the build, such as files to include, directories to create, and settings for VIs.
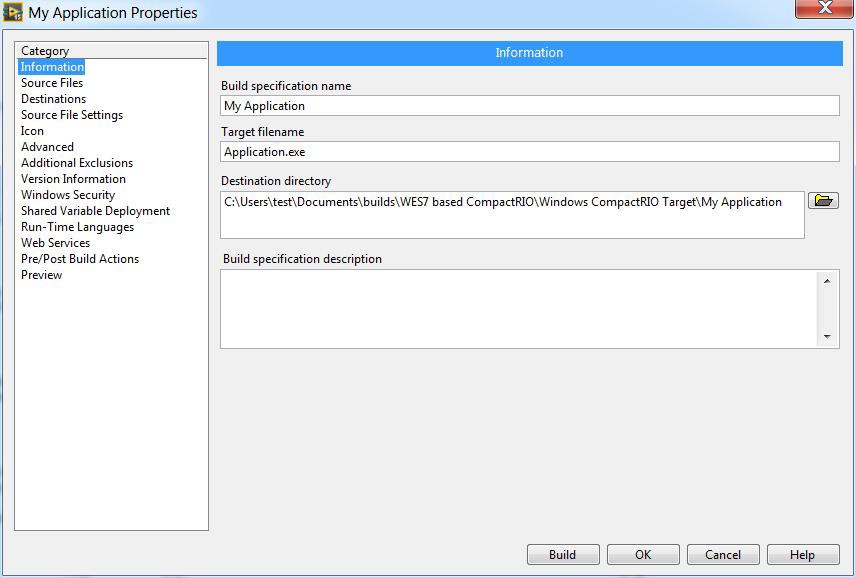
- You can create a build specification by right-clicking Build Specifications under the Windows CompactRIO target in the Project Explorer window and selecting New»Application (EXE) or New»Installer from the shortcut menu.
3. Name your Application or Installer and note the Destination directory:
LabVIEW Project Deployment
After creating the build specification, right-click the build specification in the Project Explorer window that you just created and named and select one of the following options from the shortcut menu:
Build—Builds the build specification, such as an application or installer. This option does not deploy the installer to the target automatically.
Deploy—Builds the installer and deploys the installer to the target in the specified directory. This option does not run the installer on the target automatically.
Install—Builds, deploys, and runs the installer on the target to the location specified in the build specification.
USB Drive Deployment
- Transfer all files in the Build Specification Destination directory to a USB Flash Drive and safely remove it from the development computer.
- Plug the USB Flash Drive into one of the USB ports on your CompactRIO.
- Once the drive appears in My Computer (or Computer), copy the files from the USB Thumb Drive to your desired location on the CompactRIO target.
- Repeat these steps process each time you want to execute a new version of your application on your Windows based CompactRIO.
Next Steps
To supplement this initial introduction to remote development for Windows-based CompactRIO, visit the following technical documentation:
- Getting Started with LabVIEW FPGA
- CompactRIO Developer's Guide
- Getting Started with CompactRIO Hardware and LabVIEW