NI does not actively maintain this document.
This content provides support for older products and technology, so you may notice outdated links or obsolete information about operating systems or other relevant products.
This page houses archive versions of the Real-Time Application Deployment (RTAD) utility. The utility has been renamed since to Replication and Deployment (RAD) utility. The download links and documentation for old RTAD and RAD versions can be found below. If starting a new configuration management effort, please use the current version of the RAD utility, which can be found at: Replication and Deployment (RAD) Utility. For more information, please review the article on Using the RAD Utility with Newer Versions of LabVIEW.
Version 2.1 – Built with LabVIEW 2010
Requirements: LabVIEW 2010 SP1 Runtime Engine, NI-RIO Driver
Requirements: LabVIEW 2010 Full Development System, LabVIEW Real-Time 2010, Asynchronous Message Communication (AMC) Reference Library
Version 1.0 – Built with LabVIEW 2009
Requirements: LabVIEW 2009 SP1 Runtime Engine
Requirements: LabVIEW 2009 Full Development System, LabVIEW Real-Time 2009, Asynchronous Message Communication (AMC) Reference Library
To install the reference application, unzip the installer ZIP file to an empty working directory and run the installer (setup.exe). The installer will place a compiled executable of the utility in your LabVIEW projects directory and make it available in the Tools menu in your LabVIEW environment. The installer does not include the LabVIEW Runtime Engine or the NI-RIO driver. As a result, in order to correctly use the reference application downloaded from the installer, the corresponding LabVIEW Runtime Engine and NI-RIO driver are required.
The Source Code ZIP file contains only the source code with no installer. This code can be unzipped into any folder on your system. In order to open and run the source code you must also download and install the Asynchronous Message Communication (AMC) reference library from NI Developer Zone.
To enable Version 2.1's full feature set, the NI RIO driver as well as the CompactRIO Information (CRI) reference library should also be installed. However, the features requiring these components can be disabled in the source code if desired. The NI RIO driver is required to deploy bitfiles to FPGA flash and the CRI is required to gather backplane information used for deployment compatibility verification. These features can be disabled in the source code by setting both the RIO_INSTALLED and CRI_INSTALLED conditional disable symbols in the project to False.
Note: This application is meant to be an example and used as a “Go-By” for creating your own custom deployment applications.
The above referenced Code is provided As Is. It has not been tested or validated as a product, for use in a deployed application or system, or for use in hazardous environments. You assume all risks for use of the Code and use of the Code is subject to the Sample Code License Terms which can be found at: //ni.com/samplecodelicense
Version 2.1 of the utility is installed by either rtadu_2109_installer.zip or rtadu_2109_source.zip includes the following list of new features not present in the 1.0 downloads:
Version 2.1 is not compatible with images created using the 1.0 version of the utility. Additional information regarding the use and implementation of these new features is provided in the remainder of this document.
Being able to replicate the image of a real-time target makes deploying targets and systems easier and more efficient. Whether the user is making periodic backups of a system, deploying from a developed system to many new ones, updating an image on a target, or giving someone else the tools to duplicate a working system, replicating an image makes all of these applications possible. The Real-Time Application Deployment utility makes the system replication simple and intuitive.
When replicating applications from one target to another, the application image is retrieved from one RT target and copied to another. The application image is the contents (all of the files and directories) of the hard drive of a RT target which define the behavior of the RT target, as well as any bitfiles set to deploy to FPGA flash memory. The utility only supports transferring images between identical controllers and backplanes. If you receive an image from a specific controller, you can only deploy that image to controllers with the same model number.
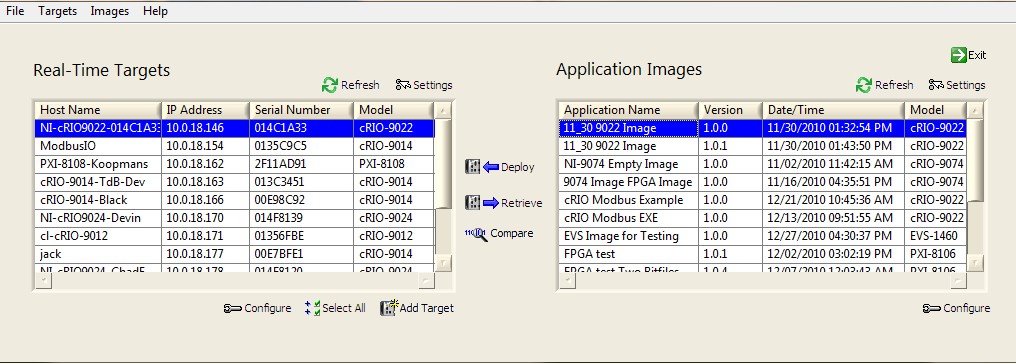
The Real-Time Application Deployment utility shows these two entities, RT Targets and Application Images, in two tables on the main UI of the utility.
Figure 1: RT Application Deployment Utility with RT Targets and Application Images
The Real-Time Targets table shows all of the real-time targets available on the local subnet as well as any network targets manually added to the list. These targets can be used for both image retrieval and image deployment. The Application Images table shows all of the available images which are stored on the local hard drive and can be deployed to a target system.
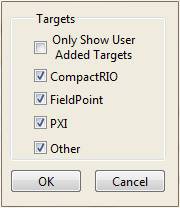
The first step in replicating a real-time system is retrieving the application image. The Real-Time Targets table of the RTAD utility contains a list of the RT target systems on the network. Using the Settings button above the table you select the types of RT targets that will be shown in the table. The options for real-time targets include CompactRIO, FieldPoint, PXI, or all other systems. You can also chose whether or not you would like to see all targets on the local subnet, or just those targets added to the utility manually. The dialog box for selecting these options is shown below.
Figure 2: RT Target Configuration Dialog
After the target type selection is made in the configuration dialog and the Refresh button is clicked above the Real-Time Targets table, all of the available targets of the types specified will be listed in the table.
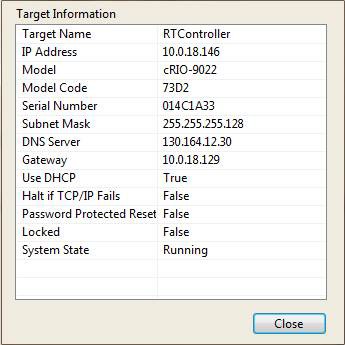
The user can view basic information about each target in the table. Additional information about each target system is available by right-clicking on a target in the table and selecting View Target Info.
Figure 3: RT Target Information Dialog
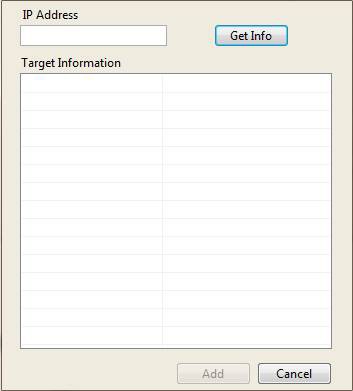
To add a target to the list that is not on the local subnet, click on the Add Target button to view a dialog similar to the one shown below.
Figure 4: Add Target Dialog
Next, enter in the IP address of the target that you would like to add to your user list and click Get Info. If the information displayed in the table looks accurate, click the Add button to add this target to the window. The target will remain added to this window even after closing and reopening the application. To permanently remove the item from the window, simply right-click the target that you would like to remove and select Delete Target.
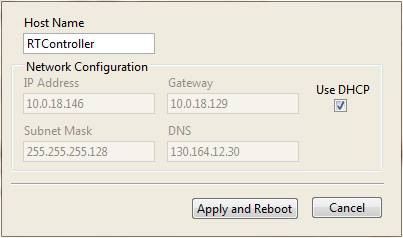
The RTAD utility also provides the functionality to change some of the network settings for targets that are on the network. In order to change the network configuration settings of a target, the user can select the target and click the Configure button to bring up a dialog box similar to the following.
Figure 5: RT Target Network Configuration
To copy the application image from a RT target to the local hard drive, select the appropriate target in the table and click the Retrieve button in the center of the UI.
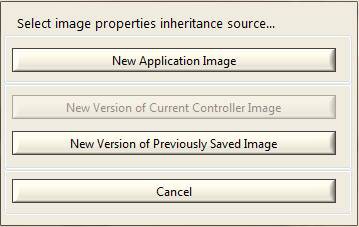
There are three scenarios for retrieving an application image from a target. The application could either be a brand new application, or it could be new version of a previous image either currently on the controller or previously saved to disk.
Figure 6: Select Image Properties Inheritance Source
If the current application is a new version of an older application, it is best to inherit the old application properties. If you are creating an image of the application for the first time, select New Application Image.
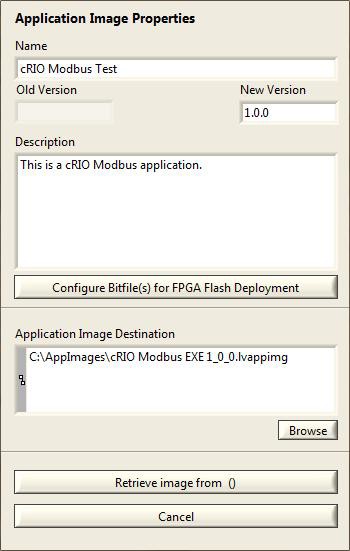
After making this selection, the user will be presented with the following dialog box where they can specify the local file for the application image and specify some additional information which will be stored with the application image. If this is not a new image, properties from the old version of the image will automatically be populated.
Figure 7: Retrieve Application Image from RT Target Dialog
The version field can be used to keep track of different versions of the same application image. If this is not a new image, the old image version number will be displayed. This version number will be automatically incremented in the New Version field, but can be changed to any version number as long as the New Version is greater than the Old Version number.
In addition to retrieving and deploying an image of the RT hard drive, the utility can also deploy bitfiles to FPGA flash memory. Saving a bitfile in flash memory has some advantages to deploying the bitfile from the RT EXE. For more information regarding the pros and cons of FPGA deployment options, see Managing FPGA Deployments.
If your application does require that one or more bitfiles get deployed to FPGA flash, bitfiles can now be saved with an image during retrieval and then later deployed to flash when the image is deployed. Click Configure Bitfile(s) for FPGA Flash Deployment to edit your FPGA flash deployment settings for this particular image and the following dialog will appear.
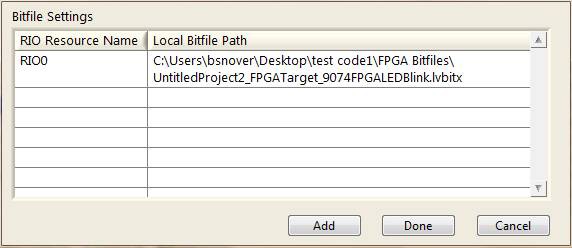
Figure 8: FPGA Flash Deployment Settings Dialog
You can now add one or more specific bitfiles located on your local hard drive to be saved with the retrieved image. Note that this bitfile must be found on the local hard drive because it cannot be retrieved from the FPGA flash directly. Also note that you will receive a warning if the selected bitfile was not compiled to run when loaded, as this is the most typical use case for a FPGA flash deployment. Make sure that the RIO Resource name matches the name of the FPGA resource for your image. Once the proper settings have been specified click Done.
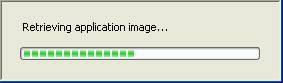
After all of the settings and descriptions are entered into the Retrieve Application Image dialog, click the Retrieve application button to copy the application image from the selected target. During the retrieval process the following dialog will be shown.
Figure 9: Retrieve Application Image Progress Dialog
If there are any errors during the retrieval process they will be shown in an error dialog afterwards. If the image has been retrieved without errors, some additional files will then be transferred to the controller. These files contain additional information about the image properties and guarantee that the content of the controller’s hard drive is identical to the retrieved image. It also makes the image properties available for future retrievals.
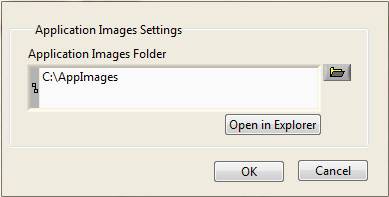
To deploy an application image to a RT target on the network, the image must be stored in a folder accessible to the computer running the RTAD utility. This folder can be located on a shared network server. The Application Images table in the utility shows all of the available application images in a specified folder. In order to change the folder used to store the application images, click the Settings button above the table to bring up a dialog similar to the following.
Figure 10: Application Images Settings Dialog
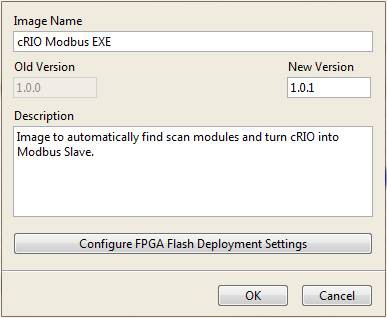
All of the application images in this folder (*.lvappimg) will be shown in the table. In order to view or update the additional information of an application image in the table, you can select the image and click on the Configure button below the table. Using this dialog you can update the name, version, FPGA deployment settings, and description stored in the application image.
Figure 11: Application Image Configuration Dialog
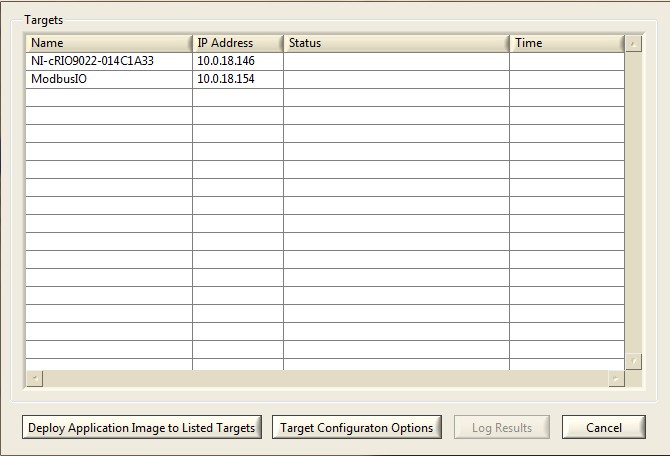
To deploy an application image to one or more targets, select the image in the right hand table and select the desired RT targets in the left hand table. You can select multiple RT targets using a Ctrl-click or Shift-click or by clicking the Select All button. After completing your selection click on Deploy at the center of the UI. The following dialog will be shown to confirm your RT target selection and allow for additional target configuration options.
Figure 12: Application Image Deployment Dialog
If multiple targets were selected in the Real-Time Targets table, then there will be more than one entry in the table.
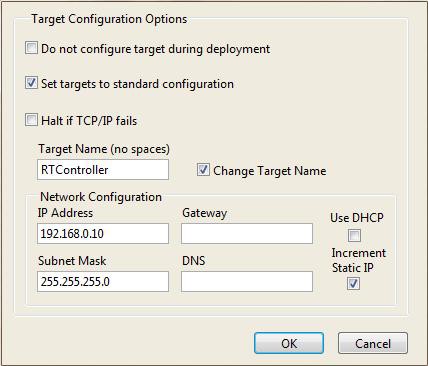
As part of the deployment process you can apply some additional configuration settings to each individual RT target. This configuration is mandatory if the current network settings for the target are unconfigured. The RT Application Deployment utility allows you to apply a specific network configuration to all RT targets during the deployment process.
By clicking on the Target Configuration Options button you get the following dialog which allows you to configure the network configuration settings.
Figure 13: RT Target Deployment Configuration Dialog
There is an option for each target to keep its existing name during the deployment, or for the same name to be applied to all targets. In addition, there is an option to assign each controller the same IP settings or to increment the static IP address applied to each target during deployment.
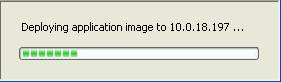
After verifying the selected targets and setting any desired network configuration options for your RT targets, click on Deploy Application Image to Listed Targets to begin the deployment process. The application image will be deployed to the selected targets in sequential order, one at a time. During this process the following progress dialog will be shown. This process will take several minutes per RT target.
Figure 14: Application Image Deployment Progress
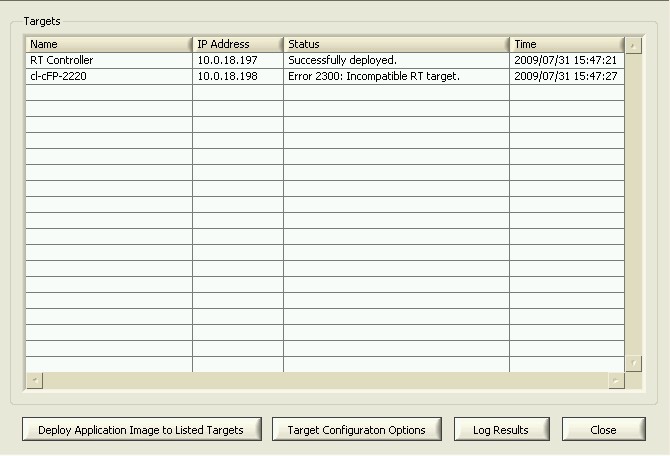
After the deployment is completed the Deployment window is updated with the results of the deployment process. Any errors from the deployment will be shown in the table.
Figure 15: Application Image Deployment with Results
You can store the information and result from the deployment process in a text file using the Log Results button. This tab separated value (TSV) file can be loaded in Excel or imported into a variety of databases.
Figure 16: Deployment log file loaded in Excel
In addition to retrieving and deploying application images, the utility provides tools for image management. The biggest such tool is the utility’s image comparison feature. The comparison tool compares each file in two images to notify the user if any files have been modified, added, or removed.
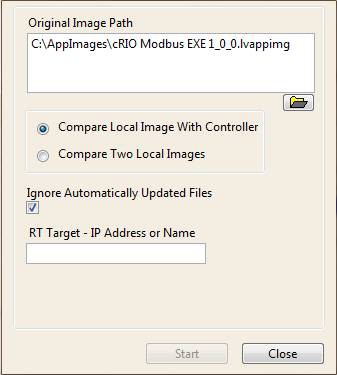
There are two ways to perform a comparison. An Application Image saved to the local disk can be compared to either the files on a specific controller or to another image saved on disk. To view the comparison options for a specific image on disk, right-click that image and select Compare AppImage. If the user then selects Compare Local Image With Controller, the dialog will appear as shown below.
Figure 17: Compare Local Image to Network Controller Dialog
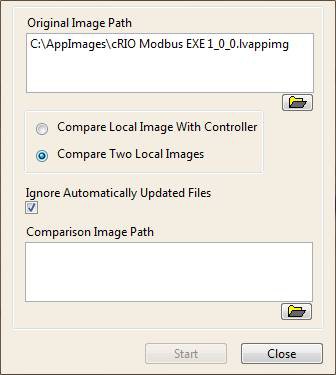
However if the user selects Compare Two Local Images, the dialog will instead appear as shown below.
Figure 18: Compare Two Local Disk Images Dialog
The Ignore Automatically Updated Files checkbox is used to determine whether or not the tool will ignore temporary files as well as files that are written to each time the target reboots. This allows the user to choose between a complete comparison of every file in both images, and a comparison that will filter out files that are expected to have differences.
The comparison tool can also be run using the Compare button in the middle of the main application window. If this button is clicked, the comparison of the selected controller and application image will begin automatically with the Ignore Automatically Updated Files option enabled.
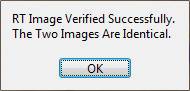
Clicking either the Start or Compare button will begin the comparison process. Once the comparison begins, each file on both images is compared for changes. Files that are found in one image and not the other are also identified. This process may take several minutes to complete and a progress dialog will be displayed until completion. If the tool completes with no differences found, the following dialog will appear.
Figure 19: Identical Images Notification
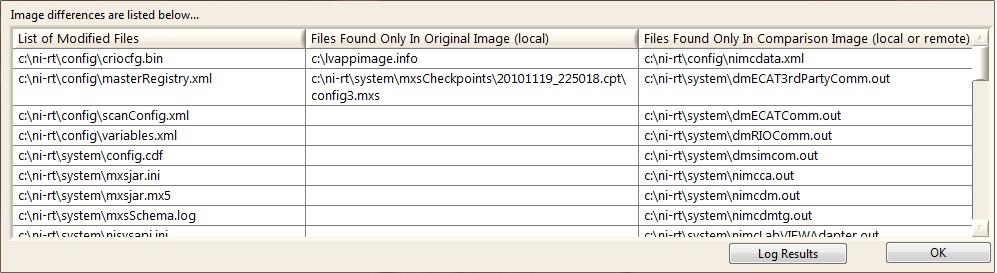
However, if any differences are identified, they will be listed in the following table. If desired, the results can then be logged to a TSV file similar in format to Figure 16.
Figure 20: Image Comparison Results Table
The following is a quick list of steps for retrieving an application image from a RT target:
The following a quick list of steps for deploying an application image to a RT target:
This section contains additional information about the design and implementation of the RT Application Deployment (RTAD) utility to facilitate customizing this reference application for your application specific requirements. The source code of the utility is provided in the \examples\RTADU folder in LabVIEW and includes a project with an application executable and an installer build specification.
An Application Image is the contents of the hard drive on a RT target which defines the behavior and operations of the RT system. In order to create a RT application image you normally develop the application in the LabVIEW environment and initially deploy it to the RT target from the LabVIEW project. Typically this means building a RT executable, setting it to run on startup and deploying it to the RT target. Before using the RT Application Deployment utility you should have gone through this process and thoroughly tested your application on the standalone RT target.
There are some other uses of the RT Application Deployment utility which do not involve building a RT executable or even running an application on your RT target. For example you can use this utility to create and quickly deploy clean images of a RT target back or switch between different versions of LabVIEW Real-Time installed on a RT target.
The basic application image is created and deployed by the RT System Replication VIs used in the RTAD utility. These VIs store the files of the application image in a ZIP archive file. The RTAD utility uses *.lvappimg as the default extension for the application image files. You can use a different extension if desired or change the default used by the application.
Once created, both an application image properties file and any selected FPGA bitfiles are then added to the *.lvappimg file and the imaged controller.
In order to store additional information as part of the application image, the RTAD utility creates an additional INI configuration file (rtad_Create AppImage Info File.vi) during the retrieval process and adds it to the application image file created by the RT System Replication VIs. The file name for this file is lvappimage.info. It contains the following additional parameters:
The utility reads information from this file (rtad_Read AppImage Properties.vi) when refreshing the application images table and allows you to update this information for existing application images.
The Application Image Identifier is a globally unique identifier (GUID). It is added to the lvappimage.info so that different versions of the same image can easily be tracked and identified, despite any changes to the image properties. However, no code has been created to expose this functionality. Instead the GUID is a feature that has been added simply to enable future enhancements to the tool.
You can add to or edit the information stored in this file in the source code.
The RT System Replication VIs also create an INI configuration file (RTImageInfo.ini) as part of creating the application image. You should not modify the contents of this file.
The RT Application Deployment utility uses the Queued Message Handler (QMH) design pattern as the basis of the main VI and several subVIs. This design pattern and the Asynchronous Message Communication (AMC) library used in the QMH are described in detail in the AMC and QMH documentation.
The QMH uses a basic event structure to receive user input from the front panel and creates messages in the queue to be processed by the VI. The message processor contains a case structure with a case for each of the operations of the VI. Some of the main operations of the RTAD utility handled are Refresh AppImages, Refresh Targets, Retrieve AppImage, and Deploy AppImage. Some user interaction may cause multiple operations to be performed by the message processor or some operations will always cause another operation to be performed. For example when the Retrieve AppImage operation is performed, it calls Refresh AppImages in order to update the table of application images on the main UI.
In addition when the utility is started some initial messages are placed on the queue in order to initialize the application.
The message processor contains an application state cluster in a shift register. This cluster contains basic information about the application including:
Information from this cluster is used and updated by many operations in the utility.
In addition to this, the RTAD runs a resize engine in parallel with the rest of the application used to handle any application resize events. The resize engine was designed to equally grow and shrink the RT Targets and Application Images listboxes as the application is resized. All buttons are also shifted as necessary to properly align with the listboxes that have been resized. Finally, the columns of the multicolumn listboxes are auto-adjusted based on the resizing performed. This was achieved using splitter bars and VI Server properties.
The RTAD utility initialization process consists of these operations.
Init - Default: Initialization some front panel objects and values in the state cluster, such as the name for the application configuration file and default location of the application images folder.
Init - Load Config: Read the application configuration file and store the data in the state cluster.
Init - Configure Settings: Based on the data from the configuration file, initialize some other settings in the utility.
Refresh Targets - Update the list of RT targets in the state cluster. This operation also calls Update UI which refreshes the UI.
Refresh AppImages - Update the list of application images in the state cluster. This operation also calls Update UI which refreshes the UI.
The RTAD utility uses a configuration INI file (rtad_config.ini) which is stored in the same folder as the top level VI or executable. This information in this file is loaded during initialization of the utility and the file is updated during shutdown of the utility. It contains the following information about the utility.
Application Images Path
Folder where the application images are stored
RT Targets Settings
Setting which filters the RT targets that are displayed in the Real-Time Target table
User Added Targets Information
Information regarding the number of targets that have been manually added to the RT Targets listbox and their associated IP Addresses. This information is saved so that targets added to the list will remain in the list between application restarts until they are explicitly removed.
Application Mode
This entry is used to further customize the UI and/or operation of the RTAD utility. This setting is currently set to 'Manager'. If this setting is missing the Retrieve Application Images and Configure Application Image buttons are removed from the UI to prevent changes to the stored application images. You could define additional user profiles and configure the operation of the utility during the initialization process based on this setting. In a more complete implementation you would add complete user management and verification into this process.
This operation is performed using the RT Get Target Information VI from the RT utilities and returns a list of all RT targets on the local subnet as well as any targets manually entered into the utility.
Progress Popup
During the Refresh Targets operation, as well as during several other longer operations in the utility, a Progress dialog is shown. This VI is a dynamic VI which is started using Util_Progress Show Progress Popup.vi. The progress bar is only intended to show activity by the utility and does not indicate the actual progress of the operation. The progress dialog is closed using Util_Progress Close Progress Popup.vi after the operation is completed.
In order to update the list of application images available to the user, the utility retrieves a list of all files in the application images folder matching the default extension (*.lvappimg). For each of these files it extracts the default (RTImageInfo.ini) and custom configuration (lvappimage.info) files from the ZIP archive and reads the pertinent information. This list of application images is stored as a cluster array in the state cluster of the utility.
The retrieval of application images follows a specific sequence of steps implemented in rtad_Retrieve Application Image From Target.vi.
The utility uses the LabVIEW RT Utilities API to retrieve an image from a target, and the FTP API installed with LabVIEW Real-Time to handle all other FTP functions. Wrapper VIs were created around all deployment and FTP functions so that a different deployment or file transfer technology could easily be used in the utility. To use a different deployment or file transfer API, simply replace the code in the existing wrapper functions with the desired code and convert any inputs or outputs as necessary.
Any files transferred to the controller are saved in the controllers C: directory. The application assumes that all controllers are using the standard username and password for their FTP server. If your controller’s FTP server is password protected, the utility will have to be modified to accommodate this. The proper credentials could be read from file, hard-coded into the FTP Wrapper functions, or entered at run-time by the user. Alternatively, the code that performs the FTP after retrieval could simply be removed.
The created lvappimage.info file gets transferred to the controller after the image retrieval so that the controller image is identical to the locally saved version and so that if a new image is created from the controller, the old image properties can be made available.
The FPGA bitfiles are saved with the image so that the user does not have to keep track of the local version of the bitfile on disk. Once the image has been created, the FPGA bitfile used to create the image can be modified or deleted, but the behavior of the image will remain unchanged if redeployed. The only downside to this approach is that the bitfiles can occasionally get very large, and will use limited disk space on the controller. If this is a concern, the utility can be modified to always search for the bitfile on local disk instead of within retrieved or deployed images.
Deploying an application image to one or more targets is a more intricate process as it must first check for image compatibility, deploy the application image files, deploy any selected bitfiles to FPGA flash, and finally apply any custom network settings to the selected RT targets.
The image compatibility simply checks to see if the hardware of the original controller matches the destination controller. By default, only the controller type is compared. However, an additional comparison of the controller backplane can be enabled to ensure that the image’s bitfiles can properly be deployed to flash. The CRI is used to retrieve backplane information from a cRIO controller during retrieval and deployment. If the backplanes don’t match, then the user will be notified that the image is incompatible. There are currently some limitations to this approach. The CRI can only retrieve information from a controller if RIO has been installed. As a result, a backplane compatibility check cannot be performed on a unconfigured target. Also, the CRI currently only works for cRIO backplanes, although it can be modified to support PXI FPGA targets. It is because of these limitations that this feature is disabled by default.
If desired, the FPGA portion of the compatibility check can be enabled by changing the CRI_INSTALLED conditional disable symbol in the project to True. When enabled, this check is only performed if the image contains a bitfile for FPGA flash. Therefore, there is no safeguard against a RT application that attempts to deploy its FPGA bitfile to an incompatible backplane at runtime.
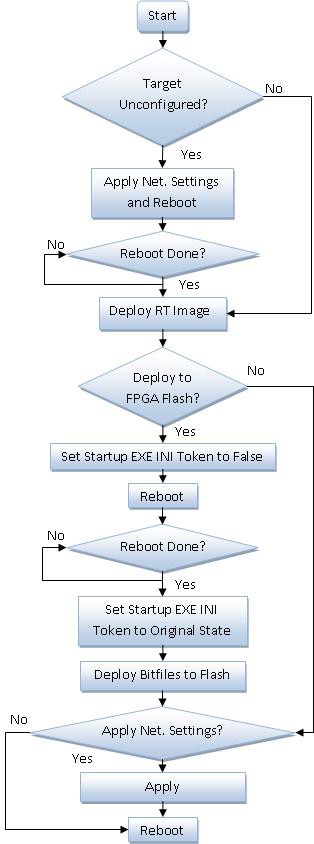
If the target compatibility check returns no errors, the deployment process then begins. The following flowchart describes the process. This process, along with the target compatibility check, occurs sequentially for each selected deployment target in a loop.
Figure 21: Deployment Process Flowchart
The deployment process also includes the option to configure and then apply custom network settings to the RT targets during the deployment process. This option is of interest where you may have a large number of RT targets configured for DHCP during the deployment process in order to automatically assign them different IP addresses, but you want them all to have the same static IP address after deployment when each controller is built into its own system.
The option to apply custom network settings is handled in two steps. The first is the configuration of these settings which is handled by rtad_Target Configuration Options Dialog.vi. The information from this step is stored in a cluster and passed to the second step. The second step is the application of these custom settings to each RT target before the application image has been applied to a specific target. The application of custom network settings is handled by rtad_Configure Target.vi. In order to further customize or enhance this process you would normally update both of these VIs according to your needs and modify the cluster in order to pass the configuration information.
The deployment of the application image to each RT target is implemented in rtad_Deploy Image State Machine.vi. This sequential process does require several minutes for each RT target, depending on the size and number of files in the application image. The current RT System Replication VIs do not support simultaneous deployment of application images to multiple targets.
The FPGA flash deployment requires a version of NI-RIO to be installed. This feature is enabled by default. To disable this feature and run the utility on a machine without NI-RIO, the source code must be modified so that the RIO_INSTALLED conditional disable symbol in the project is set to False.
If the image contains an FPGA bitfile for flash deployment, then the ni-rt.ini file on the target is modified so that the start-up exe does not run on a reboot. The target is then rebooted and the FPGA bitfiles are deployed. The ni-rt.ini token is reset to its original state, and the target is rebooted for the last time. The deployment process will not wait for the reboot to complete during the last reboot. This may prevent the deployed target from appearing in the Target List after a deployment. Hitting refresh after a few moments should show the target in the list once again.
During the deployment process the result of the deployment for each RT target is stored in a String Array Shift Register in the For loop, and the table of selected targets on the dialog UI is updated. This string array and additional information about each target can be logged after the deployment process is completed. The RTAD utility stores this data in a Tab Separated Value (TSV) file, which can be opened in a text editor or Microsoft Excel, or can be imported into a database. This file contains the following information about each target in the deployment process:
The VI (rtad_Write Deployment Results to File.vi) which stored this data to file can of course be updated to directly store the data in a database.
The comparison tool works by creating a checksum of every file in the two images and then compares these checksums one by one. The file names of any files that are different or that appear in one image and not the other are then saved. The comparison is performed by the rtad_RT Image Compare Dialog.vi which can run as a dialog or in the background. This VI was designed so that it can also run as a standalone tool or as a component of a different application.
The comparison process is fairly straightforward. First two images are gathered. If the tool is comparing two images saved locally, then no work is required to gather the images. However, a comparison of a local image to the image of a network controller requires that the network controller image is first retrieved.
Once the images are gathered, checksums are calculated for each file in both images and an array of file path/checksum pairs for both images are then compared. Any files with differing checksums as well as any files contained in one list and not the other are then noted.
The tool includes the option to ignore files that are commonly modified automatically by the controller. These files include anything in the controller’s temp directory as well as certain system files that may be modified at startup. This file list was found empirically and may not be exhaustive. Additional files can be added to the ignore list by adding them to the array constant in rtad_Calculate Checksum.vi.
The comparison results are then displayed in a table. This table contains a list of modified files, files found only in the first image, and files found only in the second image. Finally, the user has the option to log these results to file.
The project provided with the RT Application Deployment utility includes a build specification to build the utility into a Windows executable that can be run without the LabVIEW development environment. Besides the top level VI (RT Application Deployment Utility), you only need to include two other files in the build specification.
Util_Progress Progress Popup.vi
This VI should be placed into the same executable. It needs to be explicitly included in the build as it is being called dynamically in the utility.
rtad_config.ini
This is the configuration INI file for the utility which should be placed in the same folder as the executable.
Once built, the RTAD utility executable can be run with only the LabVIEW run time engine installed on a system. However if the FPGA flash deployment feature is enabled, the NI-RIO driver must also be installed.
RTAD Version 2.1.09 (2/2/2012)
RTAD Version 2.1.08 (7/29/2011)
RTAD Version 2.1.07 (4/7/2011)
RTAD Version 2.1.06 (3/1/2011)
RTAD Version 2.0.00 (1/20/2011) - Major Upgrade from 1.0