Updating a C/C++ Project Build
- Updated2023-02-21
- 3 minute(s) read
- Highlight a project in the Project Explorer tab, then select Project»Properties from the main menu bar. You can also right click on a project and select Properties from the context popup menu.
- Select C/C++ Build in the Properties dialog box tree, and select Internal builder from the Builder type pull-down menu.
 Selecting the internal builder uses C/C++ Development Tools for NI Linux Real-Time, Eclipse Edition, instead of an external build file, to build the executable.
 - Expand C/C++ Build in the Properties tree and select Settings.

- To set the configurations, select All Configurations from the Configuration drop-down menu.
- Select the Tool Settings tab to set the compiler, linker, and assembler options.
- Expand Cross GCC C Compiler in the Tool Settings tree. Select Includes and click
 to add the following:
- Set Include Paths (-l)
<National Instruments>\Shared\ExternalCompilerSupport\C\include
- Set Include Files (-include)
- nivision.h
- NIIMAQdx.h

- Set Include Paths (-l)
- (Optional) Complete the following steps to improve the performance of floating-point operations:
- Expand Cross GCC Compiler in the Tool Settings tree and select Miscellaneous.
- If your system is ARM, select the Other flags text box, add a space after the existing text, then enter -mfpu=vfpv3 -mfloat-abi=softfp

Note x64 targets do not recognize this flag.
- Expand Cross GCC Linker or Cross G++ Linker in the Tool Settings tree and select Libraries.
Note Cross GCC Linker appears if you are working in a C project, whereas Cross GCC++ Linker appears if you are working in a C++ project. - In the Libraries (-l) pane, click the Add... icon and add the following libraries:
nivision, nivissvc, niimaqdx - In the Library Search Path (-L) pane, click the Add... icon and add a library path appropriate for the operating system:
- Linux Arm7 32-bit
<National Instruments>\Shared\ExternalCompilerSupport\C\arm\gcc
- Linux Arm7 32-bit
- Linux-x64
<National Instruments>\Shared\ExternalCompilerSupport\C\lib64\gcc
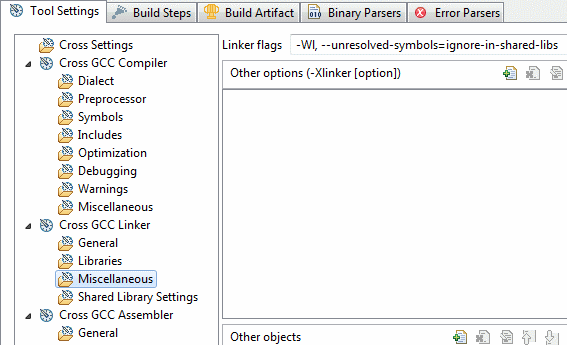
- Expand Cross GCC Linker or Cross GCC++ Linker in the Tool Settings tree and select Miscellaneous. In the Linker flags textbox, enter -Wl, --unresolved-symbols=ignore-in-shared-libs
- Click Apply and then OK to close the Properties dialog box.
- Select Project»Build Project in the workbench to create an executable of your project.
- The Console tab displays Build Finished if the build completes successfully.
After updating the C/C++ build configuration, you can begin writing a client program.