Verification and Validation with TestStand
Overview
V&V primarily affects businesses governed by ISO or FDA procedures, such as those that manufacture pharmaceuticals, medical devices, or products for automotive and aeronautical use. Since such products are highly critical to health and safety, these industries are subject to formal oversight, including well-defined V&V processes. Some companies voluntarily invest in formal V&V processes to reduce costs, or for competitive reasons. If a company’s competitiveness is based on quality or reliability, investing in a rigorous V&V process might pay for itself.
NI TestStand software helps engineers develop effective test systems by providing a modular architecture with well-defined components to address the various needs of a test system. This separation of TestStand components aids in V&V efforts, since you can define requirements for each component independently.
This document discusses V&V as it applies to test systems developed with TestStand. The following topics are covered in this document:
• Define the concepts of verification, validation, and impact analysis as applied to TestStand.
• Examine components of TestStand and how they can help streamline V&V efforts.
• Introduce general best practices for V&V.
Contents
- Validation, Verification, and Impact Analysis
- Documenting and Gathering Requirements
- Addressing V&V Challenges with TestStand
- Validating Test System Updates
- View Additional Sections of the TestStand Advanced Architecture Series
Validation, Verification, and Impact Analysis
Before discussing best practices for verification and validation, it is important to first understand the difference between these concepts and how they apply to a test system.
Validation
When developing any test system, the first step is understanding and documenting the requirements of the test. To define these requirements, you begin from the specifications for the unit under test (UUT), and develop test requirements to ensure that any deficiencies in the UUT are detected. At this point in development, it is critical to ensure that the requirements fully define any failure conditions for the UUT. The process of ensuring that the test system accomplishes the original intent is known as Validation.
Validation is the process of evaluating if a system actually accomplishes its purpose or intent.
Validation must occur throughout the test development process, but should start in the requirements gathering phase, since any deficiencies are much easier to address early in the project life cycle. Validation might include a formal pass/fail test procedure, or it might be a subjective form of a usability study performed with customers, users, or patients. Validation often involves some subjective requirements, such as “rejects defective products” or “has an easy to use interface”. When possible, you should define more detailed lower level requirements to support these subjective statements, to ensure that all parties involved agree on what is intended.
Verification
Once detailed testing requirements are developed, The test developers can design and implement a test system which covers the requirements. Once complete, engineers must ensure that the test system covers all of the defined requirements. The process of ensuring that the test system correctly addresses the specified requirements is known as verification.
Verification is the process of determining if a test system is built according to specifications provided in a design, drawing, statement of work, or other similar guideline.
Verification tests should be performed at several milestones of a product development. Verification can be performed on the entire system as a whole or on smaller components of the test system.
To illustrate the difference between verification and validation, suppose a test department builds a simple test fixture for measuring the electrical current consumption of a unit under test (UUT). The test system must compare the current measurement for the UUT power pins against test limits that require the UUT to consume less than 500mA. To address this, test developers define a requirement that “The UUT current shall not exceed 500mA at full power”. The developers then design and implement a test fixture with the required hardware to take this measurement, and create a test case to check the current of the UUT after supplying full power.
To perform verification of the test system, developers verify that the system performs the measurement correctly with acceptable repeatability, and produces a failure if the power exceeds 500 mA. If the test system behavior matches the requirements, verification passes.
However, a failure mode exists in manufacturing - a diode installed in reverse can cause some parts of the circuit not to activate, leading to excessively low current consumption of 150mA. This issues is not reported as a failure by the test systems since only a maximum limit value is tested, and failing units might be shipped. Though the test system was built correctly according to the specifications, the system does not serve the purpose it was commissioned to fulfill and therefore fails validation. The specification and the test system must be modified to incorporate an upper and a lower measurement limit, such as 400-500mA.
Performing system verification can be relatively easy based on a well-written specification, drawing, or statement of work, and test methods can be very straightforward so that defects are easy to find, but validation can be more challenging, as shown by the previous example.
Impact Analysis
After validation and verification of a test system is completed and the system is put into use, you will likely need to make changes or updates to the system. These updates might be due to maintenance, repair, or trying to improve or correct the performance of the system, such as replacing a failing instrument or modifying an algorithm or setting. When making changes to a system, it is important to understand what portions of the test system must be revalidated to ensure that the changes do not introduce defects, known as Impact analysis.
Impact analysis is the process of determining which components of a test system are affected by a set of changes you make.
Performing detailed impact analysis is important, because a change might cause the system to operate improperly in an unnoticeable manner, and might result in product recalls, production stoppages, or other interference with business. A change might also cause the system to operate properly but affect the outcome or test results, and cause incorrect decisions about tested products. The cost of a missed change or an incorrect validation can be extremely large. In some industries, shipments of faulty products can result in a product recall. The FDA reserves the right to take regulatory action.
In order to mitigate the impact of changes to a system, it is important to design the test system in a modular way, such that changes to a component do not impact others. To accomplish this, it is important to ensure that each component is fully decoupled from other components, and have independent procedures for validation. For example, you may introduce a hardware abstraction layer (HAL), which provides a standard set of functions to interface with hardware. The functions defined by the HAL can be validated independently from the remaining test system. If you make a hardware change, the impact will be to only the HAL layer, since you can verify that the HAL functions have the same behavior after the change is made.
Validation and Verification Industry Standards
The governing principles of V&V are well-defined for many industries and are outlined by disciplines like Good Manufacturing Practices (GMP) or by regulation such as ISO-9000, FDA's 21 CFR, or IEEE Standards. Each V&V system is similar but uses slightly different terminology to explain the generic requirements of the two processes. Specific requirements are usually not defined. This document explores V&V processes for automated test systems.
Validation requirements that relate specifically to medical devices in the FDA’s 21 CFR are vague, including phrases that specify that a medical device must be validated to conform to user needs and intended uses, so the quality system manager must define the needs and oversee validation testing. For test systems, one method of defining a validation test might be as simple as keeping track of known failure modes and having good and bad product samples available to help ensure the system detects known defects. Another method might use a trusted manual test procedure or include another automated system to validate the results of the new test system.
Some instances of validation must be extraordinarily thorough, such as those that surround the aeronautics, pharmaceuticals, and medical device industries, because the validation processes involve extremes cases of safety, quality, or cost. A thorough system validation can take weeks or months to define and perform. For example, if a test system uses a switch matrix in a 16x32 configuration, the test engineer may test every possible combination of connections using a continuity tester and ensure that no restricted connections are ever made. Another example might consist of validating a communication system in which every possible command and sequence of commands must be tested and validated. Although such validation processes might seem extreme, it is imperative that no damage, injury, or incorrect results arise under any circumstance.
Documenting and Gathering Requirements
V&V processes center on well-defined specifications. Validation can also be subject to some objective issues, such as loosely defined needs of the marketplace or the end user. The most important first step for any test system is to research and document a good working specification and V&V requirements. Ensuring that the test system is complete can be difficult if specifications are not specific or leave room for interpretation or ambiguities. Testing can be halted if the auditor or observer finds a setting undocumented or implemented incorrectly. A well-written specification implemented with care and attention can help ensure a painless V&V process.
Verification requires one or more design documents or drawings to govern what the system must accomplish. The documents and drawings might cover a component, assembly, or entire system. The specification and test methodology for verification must be a thoroughly detailed document with as much information as necessary to create a correct test system.
Be sure to record any changes to specifications, whether devised by a customer, by engineers, or as the result of learning and discovery. Employ a change order process to record the change and the reason, and to make the change official. Verification only passes if you match instructions, settings, and test limits to the correct document.
Designing a validation test is often subjective, and can seem like more of an art than a science, and although wisdom and experience might seem like the only tools for validation design, remember that gathering requirements can be revealing and useful. Techniques include reviewing past performance of other test fixtures or products, interviewing operators and their supervisors, and studying past measurement data. One company that commonly outsources to test system integrators performs a detailed review of each project to find ways to make the next project better, and places those ideas in a checklist for the next project.
Addressing V&V Challenges with TestStand
TestStand is built on a modular architecture, with many decoupled components, including the TestStand engine, process models, test code, and user interface. This architecture is beneficial for V&V efforts, because each component can be more easily analyzed independently. Furthermore, changes to existing test systems require less revalidation, because the impact can often be limited to a single component.
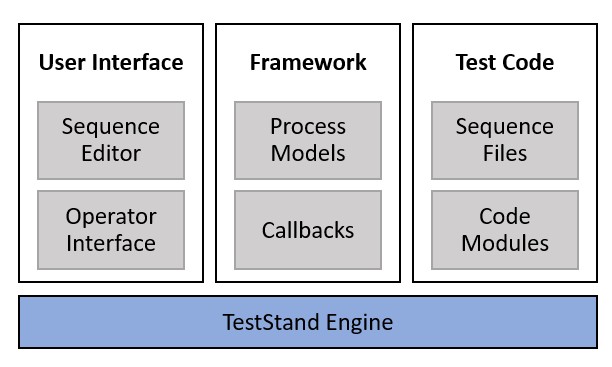
The modular architecture of TestStand allows each component to be verified and validated independently and reduces the impact of changes on the test system as a whole.
When designing a test system, it is important to consider verification and validation, and how you can architect the system to make these efforts easier. The following sections provide best practices for designing components of your test system with V&V in mind.
Designing Sequence Files
When developing test sequences, keep the following goals in mind:
- Componentize functionality by utilizing subsequences for logical blocks of functionality.
- Reduce the interaction between steps, which lessens the impact of changes to individual steps on the test system.
Focusing on these goals will allow you to better track how requirements are covered in the test code and reduce the impact of changes you make to individual steps.
Using Separate Steps versus Step Settings
When defining a condition for a step, consider if the condition will ever apply to multiple steps. Using If/Else or Case steps to implement logic are more visible in the TestStand environment, are expandable, and can be modified to run different options and include more than one step per condition. However, they introduce relationships between the test steps and the flow control. For logic that will always apply to a single step, using a precondition allows you to contain the logic and the step in a single component.
Use a similar approach when implementing switching in your test code. For routes that apply to a single test, using the switching settings of a step allow you to componentize the switching functionality with the test code. For switching that impacts multiple steps, using switching steps are more visible in a sequence and make the sequence more self-documenting.
Modularize Using Subsequences
To combine the benefits of componentization of built-in step settings with the extensibility of using separate steps, you can create subsequences to encapsulate related sets of steps. By containing sets of such sequences in a separate sequence file, you can effectively create a sequence file which is a library of functions, that can be independently validated and shared between multiple test applications.
In addition, the test sequence should be composed almost entirely of Sequence Call steps. which each implement logical grouping of tests. The organization of subsequences should map to the test specifications, where high level requirements, such as “the system shall test the audio capabilities of the device”, should map to a sequence in the test, while lower level supporting requirements, such as “the maximum sound volume shall not exceed 80 dB”, map to steps within the sequence.
Reduce Dependencies Between Multiple Steps
You can also introduce dependencies between steps is the case when a step requires data obtained in the previous step. Avoid using the PreviousStep property to directly access data from another step, and instead use a local variable to store the data from the first step, then access the variable in the later step.
You should also ensure that each step independently sets or verifies that the required conditions are set before the test is executed. For example, if an Audio Volume Test step includes a volume test at Low, Medium, and High volume, and a subsequent step performs audio quality testing that must be done at Medium volume, you should ensure that the volume is set to medium before performing the test. This ensures that both tests are independent: making changes to the audio volume test will not impact the Audio quality test.
Documenting Test Sequences
Clear documentation of your sequence files is an important part of ensuring that all requirements in the specification are sufficiently covered. However, you should avoid repeating information in documentation, such as limit values or test parameters.
You can use the step name and description to document the purpose of a step. The step name should describe what the step does and why it performs an action, but should not contain parameter values that are defined in the step. For example, instead of naming a step ‘Wait’, name the step ‘Wait for system to boot’. If the name requires more information, use the Description property of the step to specify additional details.
You can also use TestStand integration with NI Requirements Gateway to effectively track where requirements are covered in actual test code. NI Requirements Gateway allows you to quickly see which requirements are covered and allows you to navigate to the step which covers the requirement, speeding the process of verification.
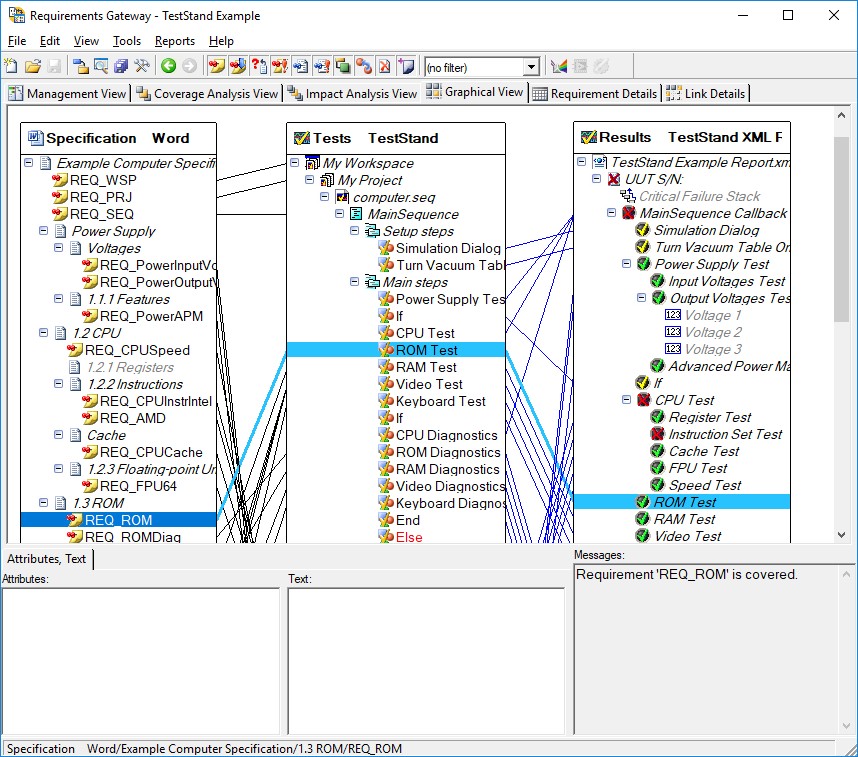
NI Requirements Gateway allows you to create linkages between your requirements documents, test sequences, and test reports to ensure all requirements are covered
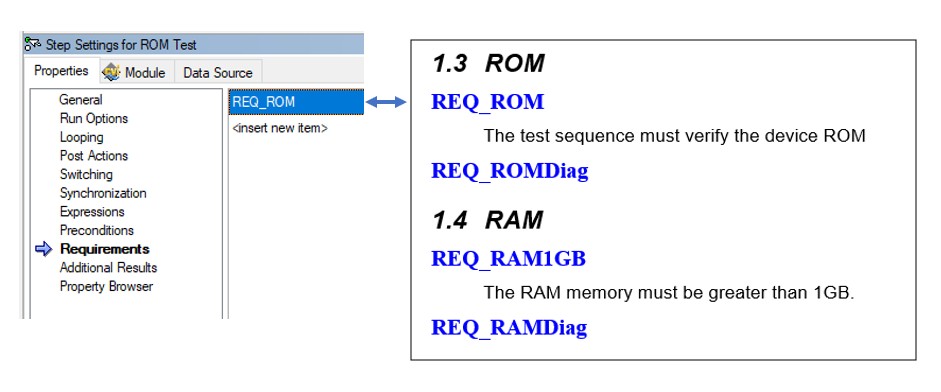
You use the Requirements field, which is available for steps, sequences, and sequence files, to provide information on the requirements that they cover. You can use these fields with NI Requirements Gateway to create a mapping between your requirements document and your test code to quickly see where requirements are covered.
Use the requirements field to map steps, sequences, or sequence files to specific requirements in your specification documents
For more information on using NI Requirements Gateway with TestStand to track requirements, refer to the Coupling NI Requirements Gateway with NI TestStand Tutorial.
Developing Independent Code Modules
TestStand steps call code modules to communicate with instrumentation and automation hardware. Code modules can be implemented in a number of languages, including LabVIEW, C++, or C#. Since TestStand provides a natural boundary between steps and code modules, it is beneficial to write code modules which can be tested and validated independently of the TestStand sequence.
To ensure code modules can be tested outside of the test sequence, avoid using the SequenceContext or other TestStand references to access data directly, and instead pass data into the code module through parameters. For cases where using the SequenceContext is necessary, such as implementing a termination monitor, design the code module so that it can function without the TestStand-specific code. In a LabVIEW code module, you can use the “not a reference” function to check if the SequenceContext is valid before using it.
With independently executable code modules, you can design test fixtures which loop over the code module, and pass all permutations of input parameters. The test fixture can then compare the results against known correct results to validate that the code modules are behaving as expected.
Making Changes to Process Models Using Plug-ins
TestStand process models handle test functionality that is not specific to a unit under test, including UUT tracking, report generation, database logging, and batch or parallel testing. The process models that ship with TestStand are complex, so making changes to these models requires significant validation effort.
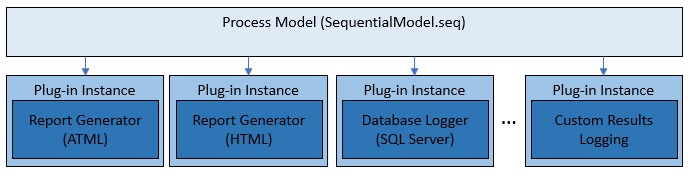
The process models use a plug-in architecture which implements the default report generation and database logging capabilities. You can utilize this architecture to extend the functionality of the existing process models without making changes to the process model sequence files themselves. To do so, you create a custom plug-in, which is implemented in a separate plug-in sequence file. You can validate the behavior of this plug-in independently.
Process models plug-ins are separate components from the process model files, which can be individually validated
If you need to make changes to functionality directly in the process models themselves, such as making changes to how the model collects the UUT serial number, consider disabling the steps in the process model which implement the existing functionality, then creating a separate plug-in for the new functionality. By using this approach, future changes you make to the custom behavior can be limited to only the plug-in, which will be easier to revalidate.
For more information on how to customize the process models and plug-ins, refer to the Best Practices for NI TestStand Process Model Development and Customization document.
Managing Test Settings & Configuration
When developing a test system, it is important to ensure that all TestStand settings are the same across all stations executing the test, and are never modified without proper validation of the change. However, since many TestStand components have individual settings, it can be difficult to ensure that no changes are present. In addition to TestStand settings, you must also ensure that instrument settings are consistent across test systems. Instrument settings can include NI-DAQmx settings made in NI Measurement & Automation Explorer (MAX), or GPIB and COM settings for a device. Such settings can be numerous and validation tests difficult to design.
One way to ensure that settings are correct is to set them programmatically in your test sequence, then query each setting to ensure that the setting was accepted by the instrument or program. If the setting cannot be queried, find where the setting is stored and read it from a text, INI, or XML file. The system can verify and record the state of items outside of TestStand and keep them under control.
Manage Files Using Source Code Control Tools
Another approach to managing settings is to strictly control the files that contain the settings. Configuration files which store all TestStand settings are stored in the <TestStand Application Data>\Cfg directory. For other settings, refer to the product specific documentation for information on the location of settings files
The industry-accepted method for monitoring, controlling, and storing test system files is Source Code Control (SCC) programs such Subversion, Perforce, and Microsoft Visual Source Safe. Many of these programs are designed to conform to the Microsoft SCC interface and you can use them from within TestStand or LabVIEW. In some cases, you cannot modify a file without taking temporary ownership of it and documenting your changes in order to save them. These programs can often tell you which files changed as well as analyze the old and new files to highlight the changes to help simplify verification.
You can also use file checksums to ensure that settings files have not changed from the validated state. To use this approach, you can add steps which compare the checksum against a checksum you calculate for the validated file value, and generate a test failure if they do not match.
Validating Test System Updates
In addition to the test system, it is important to make sure that all hardware and software supporting the test is in a known, validated state. This section provides techniques for maintaining the system state, and how to apply changes when necessary.
Managing Hardware Configuration
You must properly select, install, program, and configure the instruments not only for the system but also for each individual test. For example, a digital multimeter (DMM) or oscilloscope has several options to configure for proper communication and signal acquisition that must be verified and validated at the completion of a test system and for changes to hardware in the future.
Creating a hardware abstraction layer (HAL) to manage hardware interactions can help reduce the required revalidation when making changes to hardware in the test system. Rather than employing device-specific code modules in a test sequence, a HAL gives you the ability to decouple measurement types and instrument-specific drivers from the test sequence. Because test procedures are typically defined using types of instruments (such as power supplies, digital multimeters [DMMs], analog outputs, and relays) rather than specific instruments, employing abstraction layers results in a test sequence that is more adaptable to new instruments and requirements. With a HAL in place, you can validate new hardware by ensuring that the HAL functions produce the same output as previous hardware in a set of test cases, without the need for fully testing the entire test system. For more detailed information on using HALs, refer to Fundamentals of Building a Test System: Hardware and Measurement Abstraction Layers.
It is also a good idea to validate hardware at run time. By reading and storing settings or other factors at run time you can have confidence that items that must be validated along with the software are configured and operating as intended. For example, your TestStand steps might query the calibration dates of an instrument to ensure the calibration is current and can verify the model number and serial number of the instrument attached to a COM port to ensure that the instrument has not been replaced. Designing your test sequence and even purchasing instruments with these considerations in mind can help simplify V&V processes.
If you anticipate that your hardware must change, you must consider the change in a V&V process. If an instrument fails and another instrument of the same make and model is inserted, think about what you must accomplish to verify if it operates correctly, and design a test to ensure that the change was successful. Using Interchangeable Virtual Instrument (IVI) drivers and interfaces for instrument setup can help simplify the transition between two instruments of the same make or model, or between two instruments of dissimilar make or model.
Managing Software Configuration
When maintaining a test system, you will need to consider upgrading LabVIEW, TestStand, or any other program to take advantage of new features as they become available. Making such a software upgrade is always a trigger for a revalidation and reverification. Treat a potential upgrade as a return on investment (ROI) exercise. For example, to gain a streamlined development interface, you might want to upgrade during development but not after the system is deployed. However, as is the case with recent TestStand upgrades, improved execution speed can result in shorter test time, greater throughput, and greater revenue. In both cases, the cost of revalidation is the deciding factor, but the cost can also provide a positive ROI and is therefore worth the expense and effort. Typically, multiple software upgrades should be done at once, to minimize the number of times the software needs to be validated.
To maintain a consistent set of software on a test system, consider creating a base image from a validated system, and using this image when setting up new test stations. However, even when using an image, you must ensure that software updates do not take place. For NI software, ensure that NI update service is configured to never automatically install updates. By default, Microsoft Updates occur automatically on most computers. Other companies, such as Sun, Apple, and Adobe, also use web-based automatic updates. You must disable any automatic changes and upgrades on any system that is subject to V&V processes. The changes that automatic updates make are not predictable and can have unknown effects on operation and settings.
Your IT department might have a general policy that they control computers within the company, including using virus scanning software, setting security policies like screen savers, and installing patches and upgrades as needed. A manufacturing department must work with the IT Department to help manage TestStand systems by leaving them untouched. You must decide what items specifically affect your computers, but your needs might contrast with IT policy, such as removing virus scanners, turning off screen savers, and exempting from company-wide upgrades or patches.