Adjusting the Reading Rate of a DMM
Overview
Contents
- DMM Measurement Cycle
- Specifications for Reading Rate vs Resolution
- Adjusting the Reading Rate
- Programming in LabVIEW
- More Information
DMM Measurement Cycle
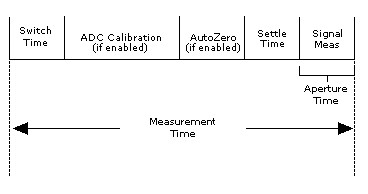
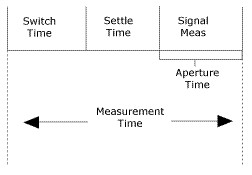
In order to control the reading rate of a DMM, it is important to understand the measurement cycles for a DMM. Figures 1 and 2 show the measurement cycles for the NI 407X and NI 4065 respectively. A brief description of each phase in the measurement cycle is below.
Figure 1: NI 407X Measurement Cycle
Figure 2: NI 4065 Measurement Cycle
Phases in the Measurement Cycle
- Switch Time - The internal switch time is required to configure the analog circuitry of the DMM for the next measurement.
- ADC Calibration - Used to compensate for an internal DMM gain error by measuring an extremely precise onboard voltage reference. This is a feature exclusive to the NI 4070/4071/4072 DMM that allows you to appropriately trade off measurement speed for long-term accuracy.
- Auto Zero - Used to compensate for internal DMM offsets by measuring ground and adjusting for the difference. For NI 407x devices, Auto Zero can be turned on or off depending on the accuracy desired. For NI 4065 devices, Auto Zero is always on and does not add any extra time to the measurement.
- Settling Time - Allows time for the DMM circuitry to settle before taking a measurement. Whenever the DMM input is connected to a different voltage or resistance, the DMM, interacting with the source, behaves as an RC circuit with a settling time.
- Aperture Time - The period in which the DMM is taking measurements. Resolution, measurement speed, and frequency rejection are functions of the aperture time.
Each part of the cycle effects your measurement's accuracy and resolution. For example the longer the settling time, the higher the resolution will be. Please refer to the NI Digital Multimeters help file for more information on specific parts of the measurement cycles and their effects on the measurement.
Specifications for Reading Rate vs Resolution
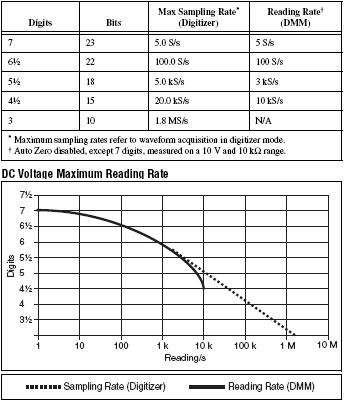
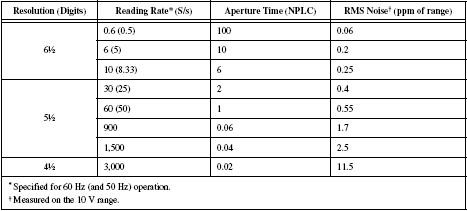
The specifications documents for both the 407x series and the 4065 series contain the maximum reading rates that are achievable at different resolutions. By default the DMM driver chooses a reading rate that is slightly optimized towards taking a more precise measurement rather than achieving the maximum speed. However the reading rate can be adjusted to achieve these maximum rates. If you need a faster reading rate at a particular resolution please read the section "Adjusting the Reading Rate" below for more information.
Figure 3: NI 4070 Reading Rate vs Resolution Specifications
Figure 4: NI 4065 Reading Rate vs Resolution Specifications
Adjusting the Reading Rate
The reading rate of a DMM is derived from the measurement cycle (Reading Rate = 1/Measurement Period). All of the phases in the measurement cycle are set by the driver to an optimized setting depending on the measurement being used. Reducing or removing any part of the measurement cycle will increase the reading rate. However doing this may have an effect on the resolution and accuracy of the measurement, but with careful choices you can minimize the affect of these changes.
There is usually many different ways to achieve a desired reading rate. Settling Time and Aperture Time are usually the two longest phases in the measurement cycle so if a large change in speed is desired consider modifying these phases. Below all of the measurement cycle phases are described along with some guidelines on when to modify them.
Switch Time
The Switch Time is set by the driver and cannot be programmatically changed. It is usually a very small value.
ADC Calibration (407x only)
By default ADC Calibration is ON when taking measurements at 6.5 and 7.5 digits of precision. If absolute accuracy is not as important for a particular test and only the change in the signal is desired, then this could be turned off to increase measurement speed.
Auto Zero (adjustable on 407x only, always enabled on 4065)
Similar to ADC Calibration, Auto Zero is by default turned ON when using 6.5 and 7.5 digits of precision. Auto Zero may be turned off to increase measurement speed but this may lower the absolute accuracy. With the 407x, Auto Zero can also be set to ONCE to only perform Auto Zero one time at the beginning of a multiple point measurement to help increase speed.
Settling Time
Default settling times vary based on the function and range specified. The longer the analog to digital converter has to settle, the more accurate a reading it will produce. The settling time is more important when measuring larger signals that vary in time or when measuring high resistances. If measuring small signals that are fairly consistent then lowering the settling time can be a good way to increase measurement speed.
Aperture Time
The larger the aperture time, the better the resolution. Select short aperture times for faster measurement speed.
During the aperture time many measurements are taken by the DMM and basically averaged together to return a single sample. Acquiring more points and averaging them usually cancels out more noise. If a system is in a low noise environment and proper shielding and cabling is used then the aperture time may be lowered without experiencing a large difference in resolution. Another source of noise is powerline noise and the aperture time can be set to a multiple of the powerline to cancel out any 50 or 60 Hz noise. (1 powerline cycle (PLC) at 60 Hz is 16.67ms)
By manually setting the aperture time the absolute resolution value is ignored. Therefore if you specify a 6.5 digit measurement earlier in your code this programmatically determines the aperture time. If you then manually set a smaller aperture time then you may no longer be at 6.5 digits since the aperture time is related to the resolution. However, even though the two are related, the aperture time can still be tweaked to achieve faster reading rates while maintaining the same resolution depending on the measurement.
By adjusting the above measurement cycle phases a DMM can be optimized to not only acquire at a specified resolution but also at a faster speed. Many times a small change is needed to one or more of the phases in order to achieve the maximum speed stated in the specifications.
Programming in LabVIEW
The following sections are focused on LabVIEW applications but the same functions with similar names exist for other text based languages. Please refer to the NI Digital Multimeters help file for more information on these functions.
Adjusting the Reading Rate in LabVIEW
The easiest way to change the reading rate is to change the resolution, measurement function, or range. By changing these setting the driver will determine an optimized reading rate. If these default settings do not meet your needs then you can use other advanced functions to change the reading rate manually.
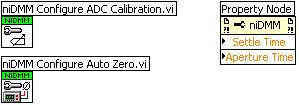
The measurement cycle phases described earlier can be modified in LabVIEW by using the functions shown in Figure 5. Two VIs exist to change the way ADC Calibration and Auto Zero behave. By default both of these are set to Auto so the driver can decide when they will be used.
To change the Settling Time and Aperture Time a property node needs to be used. Use Context Help (Control+H) to learn more about how to use these properties.
Figure 5: Advanced Functions Used To Modify the Measurement Cycle
Benchmarking the Measurement Cycle and Resolution using LabVIEW
The measurement cycle time can be observed using the "niDMM Get Measurement Period.vi" in the NI-DMM API. This VI returns the time it takes to complete one measurement using the current configuration.
Figure 6: Get Measurement Period VI
To benchmark the effective resolution the LabVIEW example "Maximizing DC Reading Rate.vi", located in the example finder, shows how changing the aperture time also affects the effective resolution of an acquisition. The resolution of the DMM's ADC is constant, but the effective resolution is determined not only by the boards ADC, but also the amount of noise on the signal. You can use this example to test your system to see how modifying the aperture time affects your effective or noise-free resolution.
More Information
Much more information on all of the phases in the measurement cycle can be found in the NI Digital Multimeters help file. The help file also includes the default values for many of these phases along with descriptions for the functions needed to programmatically change these values.
