NI does not actively maintain this document.
This content provides support for older products and technology, so you may notice outdated links or obsolete information about operating systems or other relevant products.
This document is part of the Advanced Data Acquisition Series, consisting of tutorials and interactive presentations on how you can use NI LabVIEW, NI-DAQ software, and NI hardware to easily create advanced DAQ applications.
Note: The last version of the NI-DAQmx Base driver available for download is 15.0. Please check compatibility for Windows, Linux, and macOS for supported versions of this driver. Starting in 2018, NI-DAQmx for Linux is included with the NI Linux Device Drivers. For more information, please read the End-of-Life Announcement for DAQmx Base Driver.
For a comprehensive explanation of driver installation, supported platforms, supported hardware and known issues, please refer to the most recent version of the respective readme file.
General Installation Instructions for NI-DAQmx and NI-DAQmx Base:
There are three ways to configure tasks in NI-DAQmx Base.
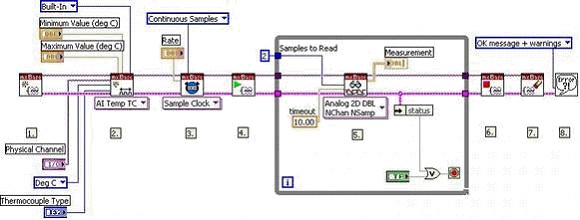
The first method, which is preferred, involves dynamically creating the task using DAQmx Base Create Task VI followed by the DAQmx Base Create Virtual Channel VI. The steps to do this are listed below with the resulting block diagram in figure 1:
Figure 1: DAQmx Base Thermocouple Example
Programming data acquisition with NI-DAQmx Base for Linux is analogous to NI-DAQmx. The NI-DAQmx Base VIs have all the same input and output terminals. The user can open each VI and tunnel down to the lowest level which leads to the RLP node. These RLP nodes call into chip objects for the hardware used. These RLP nodes are closed source. If personal modifications happen to break the driver, NI recommends reinstalling the driver as it is not possible to support personal modifications.
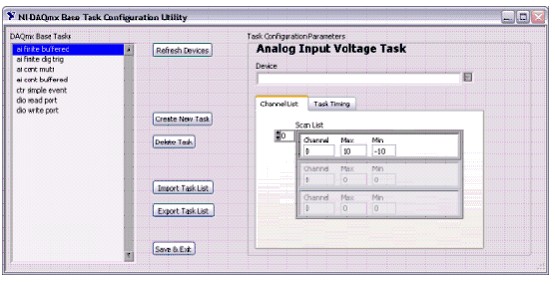
The second and third methods both use the NI-DAQmx Base Configuration Utility; the difference between the second and third method is how the utility is launched and used.
To use the second method, launch the NI-DAQmx Base Task Configuration Utility from the Tools menu in LabVIEW. Launching the utility from the Tools menu in LabVIEW includes any other tasks that may be in memory in LabVIEW at the time the utility is launched. Any changes made with the LabVIEW launched utility immediately takes effect in LabVIEW and on any C program launched after the utility is exited.
The third method involves running 'mxbaseconfig' from the command line. The 'mxbaseconfig' command opens the NI-DAQmx Base Task Configuration Utility. The utility saves its data to the same configuration file as the LabVIEW launched version, but changes made with this version are only be seen in LabVIEW if LabVIEW is restarted.
Figure 2: NI-DAQmx Base Task Configuration Utility
The NI-DAQmx Base installer includes example programs designed to demonstrate the correct use of the API for each measurement type.
LabVIEW Examples for LabVIEW are located in <LabVIEW>/examples/daqmxbase and are not indexed in the NI Example Finder.
C examples are installed by default to /usr/local/natinst/nidaqmxbase/examples. The make files create the links to the necessary libraries. Run the device configuration utility (lsdaq) before running the examples. An example that is shipped with NI-DAQmx Base is 'Acquire N Scans'. To compile and run this example:
LabVIEW help files are accessible from the LabVIEW Help menu.
Documentation is located in /usr/local/natinst/nidaqmxbase/documentation and includes the NI-DAQmx Base C Function Reference, the hardware references, and supporting PDFs.
For more information, please refer to the readme file available for download along with NI-DAQmx Base for Linux.