NI does not actively maintain this document.
This content provides support for older products and technology, so you may notice outdated links or obsolete information about operating systems or other relevant products.
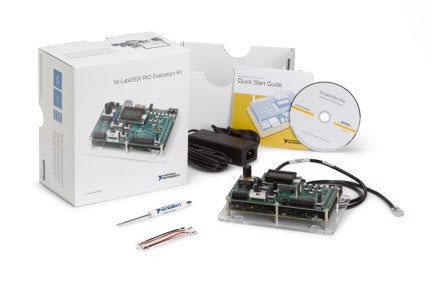
The LabVIEW RIO Evaluation Kit includes all you need to experience the NI approach for embedded systems. This approach combines a flexible software approach including LabVIEW and C/C++ with standard FPGA-based NI reconfigurable I/O (RIO) hardware platforms to reduce time to market for embedded control and monitoring applications.
The kit includes an extended evaluation of LabVIEW including the LabVIEW FPGA and LabVIEW Real-Time modules, C/C++ development tools for your target (including C/C++ compiler toolchain, FPGA interface C API, and Eclipse IDE), a LabVIEW RIO evaluation target including daughterboard for easy I/O interfacing, and a step-by-step tutorial walking through examples of common embedded tasks implemented in LabVIEW and C++
Using the Included USB Host-to-Host Cable
The easiest and recommended way to connect to the LabVIEW RIO evaluation target to your host computer is with the included USB host-to-host cable. The central node on the cable should light up when a connection has been established. This USB connection is emulated as an Ethernet device. An automatic network connection is created over the USB device port, which is handy for initial configuration and allows for system updates apart from the physical Ethernet connection. By default the target’s IP address should be hard coded 172.22.11.2. Choose Static IP when using the Setup Utility and leave the address as-is.
Where should I connect the included Ethernet Cable?
The easiest way to connect to your LabVIEW RIO evaluation kit over Ethernet is via a local network with a DHCP server. If you're connected to a network in your home or office, there is likely a DHCP server on the network which automatically assigns IP addresses to connected network devices.
If this describes your network configuration, simply use the included Ethernet cable to connect the target to a router or switch on the same network as your Windows development PC. This will allow the target to receive an IP address from your DHCP server automatically. If this does not describe your network configuration, see the next section.
A network with DHCP is not available to me. How else can I connect to my evaluation hardware?
If the DHCP connection method described above is not available, you may connect the RIO evaluation hardware directly to your computer and follow the steps below to manually configure a static IP address. If your Windows PC has only one Ethernet port, this will require disconnecting from whatever network your computer was previously on. It is not advised to have more than one network interface card with hardware directly connected. Once the RIO evaluation hardware is directly connected to your PC, plug in the power supply and follow these steps to configure a static IP address:
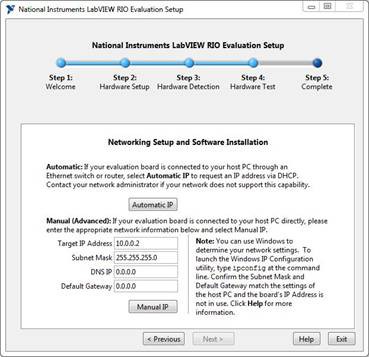
While using the NI LabVIEW RIO Evaluation Setup Utility (Start »All Programs»National Instruments»LabVIEW RIO Evaluation Kit), on Step 4 you should be prompted to configure the target's network settings. In the Manual section, type the target’s static IP address and Subnet Mask as shown below and click Manual IP.
IP address:10.0.0.2
Subnet Mask: 255.255.255.0
DNS IP: 0.0.0.0
Default Gateway: 0.0.0.0
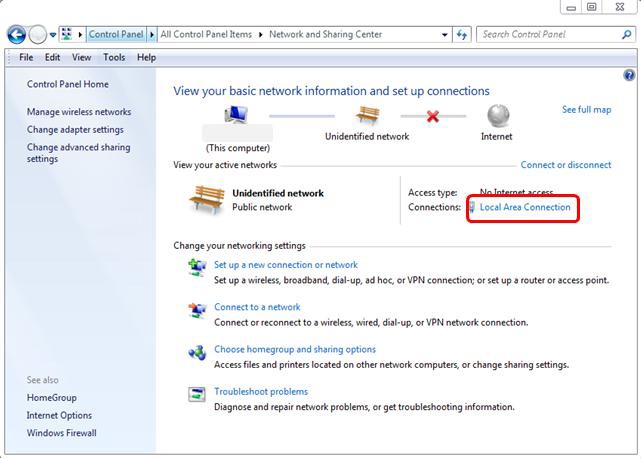
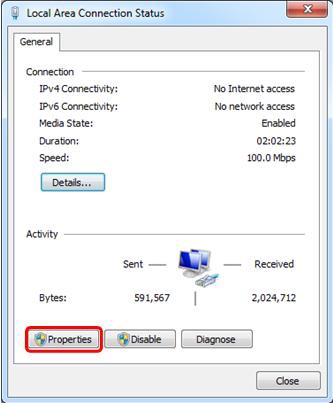
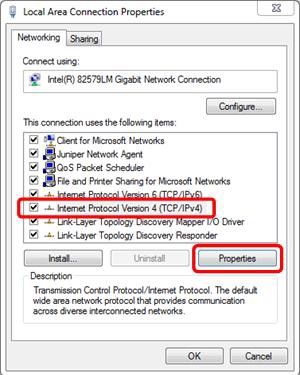
1. 5. Open Internet Protocol (TCP/IP) Properties.
Note: if configuration fails with this selection, you may need to configure Internet Protocol Version 6 (TCP/IPv6) instead.
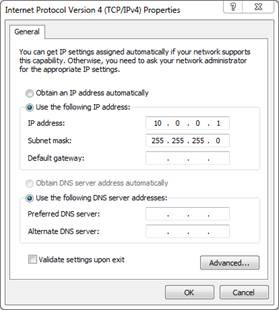
2.6. Configure Internet Protocol (TCP/IP) Properties.
IP address: 10.0.0.1
Subnet mask: 255.255.255.0
3. Select OK and close the Local Area Connection Properties (Windows 7) or Ethernet Status (Windows 8) window.
4. The target should now have an acceptable static IP address, allowing you to continue through the Setup Utility.
5. If you have any issues with the setup utility, the target static IP address can also be configured in NI MAX (Start»All Programs»National Instruments»NI MAX) following the instructions here.
What will be installed when I run the DVD installer?
The LabVIEW RIO Evaluation DVD will install 90-day extended evaluations of NI LabVIEW, LabVIEW FPGA Module, and the LabVIEW Real-Time Module. It will also include the NI-RIO driver, LCD Character Display Driver, FPGA Interface C API, C/C++ Development Tools for NI Linux Real-Time: Eclipse Edition, and a setup utility for configuring the evaluation hardware.
What else is on the DVD?
In addition to the installer, the LabVIEW RIO Evaluation DVD contains a tutorial, exercises, and additional getting started resources. These files are automatically copied to your computer when you run the DVD installer, but are accessible on the DVD if you ever need to restore your files.
The evaluation licenses included in this installer should not override existing licenses unless they are evaluation licenses of a shorter duration. In other words, if you have activated versions of NI software, they should not be affected by installing this kit. If you already have evaluation licenses of NI software with a shorter duration, they will be extended by this installer.
If you have an existing LabVIEW development license that is a version later than the evaluation software included with the kit and you ran the setup utility, then you may need to reinstall your NI-RIO driver after the LabVIEW installation.
The LabVIEW RIO Evaluation DVD is for evaluation purposes only and cannot be activated. If you are satisfied with the software and would like to continue using it, please contact a NI sales representative, or visit ni.com to find the product right for you.
After installing the evaluation software, reboot your computer. After the reboot, a program titled National Instruments LabVIEW RIO Evaluation Setup should automatically launch. This program will help you verify that the RIO evaluation hardware is set up correctly and is ready to be used in the tutorials. Use the Next button to go through all five steps of the setup program.
If this program does not appear automatically after the first reboot, you should be able to launch it by selecting Start»All Programs»National Instruments»LabVIEW RIO Evaluation Kit»Setup Utility.
Note: Your firewall software may prompt you to block or unblock this program from communicating with the target. Select unblock at these prompts and ensure the necessary ports are unblocked in your firewall. You can find a listing of ports here: Configuring Software and Hardware Firewalls to Support NI Products.
I've scanned for devices, but my RIO evaluation hardware doesn't appear. What's wrong?
First, check the troubleshooting tips included in the setup utility. If these do not resolve your problem, there may be something wrong with your hardware, firewall configuration, or network. One way to troubleshoot is to force the RIO evaluation hardware back into a known network configuration. To do this:
If you are still not successful in connecting with your target, please follow these troubleshooting steps or contact NI support at ni.com/ask.
Before testing the configuration, the program may need to configure the target's network settings and/or install LabVIEW software to the target. If the target does not have a valid IP address, you will be prompted to configure the target's network settings. You should see two options, one Automatic and one Manual. If you're using the USB Host-to-Host cable, choose Static IP in the Setup Utility and leave the default IP address as-is. For Ethernet, in most cases, you will want to select the automatic option. This is for targets connected to the Windows development PC through a network router or switch with IP addresses assigned by a DHCP server. If you're not sure what type of network you have, try this option first. If you need to manually assign an IP address to meet your IT requirements and if you configured it as described above, you should be able to just select Manual IP with the default values. Otherwise, follow the tips in the setup program to determine the appropriate settings.
Failure to install software to a detected target may be due to the target having an IP address on a different subnet. The last step on the Hardware Detection troubleshooting page explains how to manually clear your IP address so that you can reconfigure it with the utility. These steps are as follows:
After doing this, wait a few moments for your target to finish booting and select Rescan for Targets on the Hardware Detection page.
Your target should appear (again), but this time you should be prompted to configure its network settings. If this succeeds, the setup utility should now be able to communicate with your target.
If the target is not configured correctly, deployment will fail and you should see a troubleshooting screen. If there do not seem to be any problems with the hardware connections and settings, the target software may have somehow become corrupt. To perform a system restore on the target, note the warnings in the setup program and select Restore Target System.
This will reformat the target, prompt you to configure the target's IP address (see above), and then re-image the target. This process may take several minutes. Once this completes, the program should attempt to test the target again.
If this fails, try manually resetting the target's IP address as explained above. Then retry restoring the target.
The small board for the LCD on the target may be improperly connected. Look closely at where these two boards connect and ensure that they are fitting together and that the small board is securely attached (there should be no more than 1-2 mm of visible pins between the connectors). Next ensure the LCD Contrast knob, located to the left of the screen, is adjusted to be visible. If the LCD is obviously connected correctly and adjusting contrast doesn't help, it may be defective. Please contact NI Support (ni.com/ask) for help.
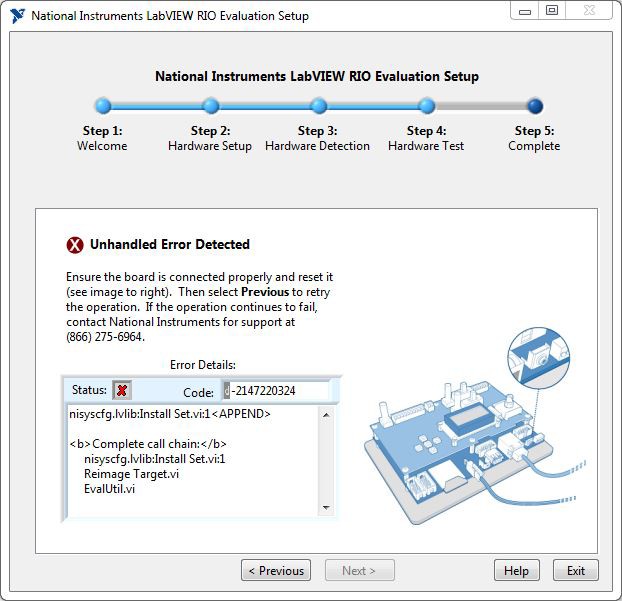
If for some reason you encounter an Unhandled Error Detected screen, there is something wrong with your network configuration. First, retry the operation that failed. If this still causes an error, follow the troubleshooting tips below. If none of these succeed in fixing the problem, please contact NI for support.
If you have completed all of the included tutorials, join the ni.com/rioeval/nextstep community to find more advanced exercises, ask questions on the discussion form, read industry case studies, and explore NI embedded systems products.