From Friday, April 19th (11:00 PM CDT) through Saturday, April 20th (2:00 PM CDT), 2024, ni.com will undergo system upgrades that may result in temporary service interruption.
We appreciate your patience as we improve our online experience.
From Friday, April 19th (11:00 PM CDT) through Saturday, April 20th (2:00 PM CDT), 2024, ni.com will undergo system upgrades that may result in temporary service interruption.
We appreciate your patience as we improve our online experience.
NI VeriStand provides an advanced stimulus profile tool for creating real-time test sequences. In addition to step-based profiles, you can create complex real-time stimulus profiles that include decision making, subsequences, and a variety of programming constructs. These elements combine to offer a flexible environment for conducting real-time tests. This paper introduces both the NI VeriStand Stimulus Profile Editor environment and some of the functionality that is commonly used when creating real-time stimulus profiles.
The NI VeriStand Stimulus Profile Editor is an executable that you can open and configure outside NI VeriStand. Because of this, you can create test profiles in parallel with system definitions and user interfaces in NI VeriStand. The NI VeriStand Stimulus Profile Editor is broken into two main components: real-time sequences and stimulus profiles. The division of these components allows for high reusability of test sequences while providing tight integration with NI VeriStand system definitions for individual tests.
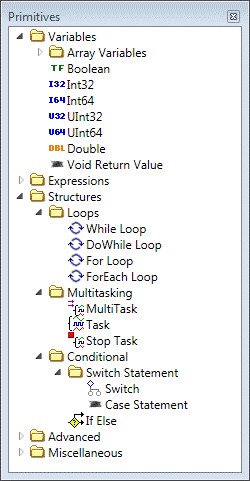
One of the main components of real-time stimulus profiles is the real-time sequence. Test sequences are deployed to the NI VeriStand Real-Time Engine and can feature a wide array of programming constructs. The functions include While Loops, For Loops, variables, and conditional statements. You can also create subsequences and establish multitasking within your test sequence.
Figure 1. An Outline of Programming Constructs of the NI VeriStand Stimulus Profile Editor
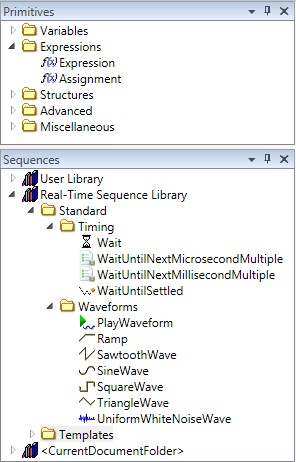
In addition to programming constructs such as looping and conditionals, real-time sequences can generate commonly used waveforms such as sine waves and sawtooth waves. You can also create more complex waveforms and signals by using mathematical functions and expressions.
Figure 2. Available Sequences and Mathematical Expressions
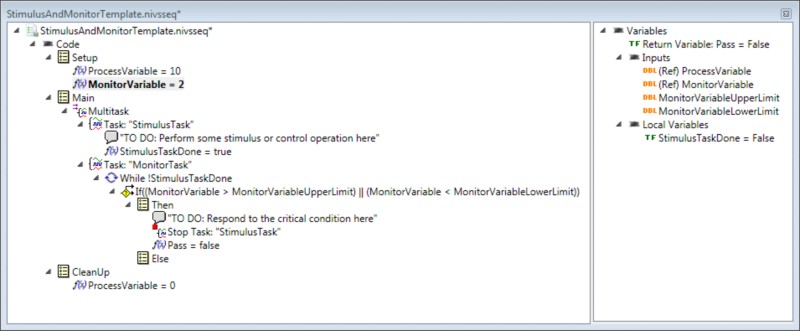
A real-time test sequence is broken into three sections: Setup, Main, and Cleanup. Setup is used for establishing initial conditions within a sequence. Most often this includes setting variables to desired initial states or taking some preliminary system measurements. The Main section is where the majority of the stimulus is generated and where specific tests are conducted. After the main tests have run, Cleanup runs to put the test system in a known state for future tests.
Figure 3. An Example of a Real-Time Sequence
The second component is the stimulus profile itself. The stimulus profile acts as a test executive that can call real-time test sequences, open and close NI VeriStand projects, and perform data-logging and pass/fail analysis. It also connects real-time test sequences to system definitions to bind channel data within the system definition to variables in the real-time test sequence. To learn more about using the Stimulus Profile Editor to control an NI VeriStand project, watch our video about creating VeriStand real-time stimulus profiles.
Much like real-time test sequences, stimulus profiles contain Setup, Main, and Cleanup sections. In the case of stimulus profiles, Setup and Cleanup are often used to perform tasks such as data logging and opening and closing NI VeriStand projects. This enables test automation and helps you transition from one type of test to another without having to manually interact with the NI VeriStand workspace.
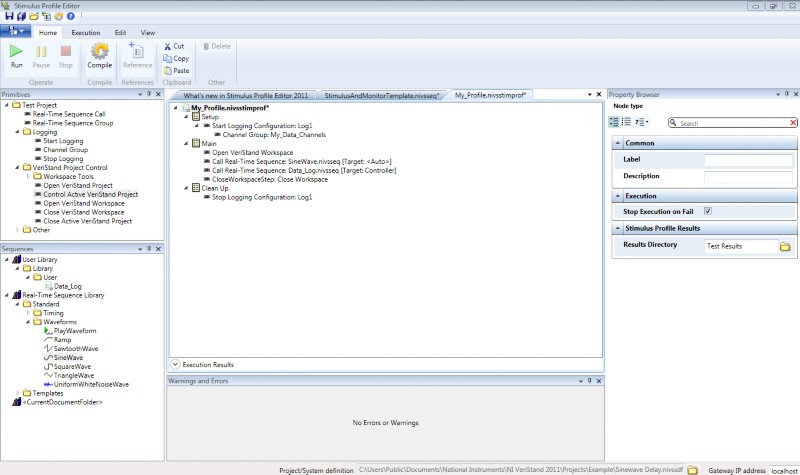
The Main section of the stimulus profile is often used to call real-time test sequences. It can call multiple real-time sequences, so you can run multiple tests without having to manually switch from sequence to sequence. With the division of real-time sequences from stimulus profiles, you can create libraries of sequences that can be used across multiple profiles and shared among multiple test stations. Figure 4 shows an example of a stimulus profile that includes logging data and calling a series of real-time test sequences.
Figure 4. An Example Stimulus Profile
Once you have created a profile, you can deploy it to a real-time target based on the system definition that you have chosen. This profile is then run on the real-time target, and the current state of the profile is displayed in the profile window on the Windows host computer. Logs are then stored in the selected file path.
In addition to deploying real-time sequences, the Stimulus Profile Editor can be used to perform test automation by replaying data stored in CSV files or by playing back user-constructed macros that were built using the NI VeriStand Macro Recording Tool.
Learn how to create and configure real-time testing applications using VeriStand for high-speed data acquisition, automotive networks, and FPGA-based reconfigurable I/O. This video includes a hardware overview as well as an introduction to creating a VeriStand project. You will learn how to use the System Configuration File to import devices, networks, custom plug-in code, and more. Additionally, the video teaches you how to add and customize DAQ channels for high-speed waveform or single-point input and how to create or import measurement scales.