Hosting a WebVI Securely on Your Own Network Using NI Web Server
- Subscribe to RSS Feed
- Mark as New
- Mark as Read
- Bookmark
- Subscribe
- Printer Friendly Page
- Report to a Moderator
Products and Environment
This section reflects the products and operating system used to create the example.To download NI software, including the products shown below, visit ni.com/downloads.
- G Web Development Software
- LabVIEW
Software
- Windows
Operating System
- LabVIEW G
Programming Language
Code and Documents
Attachment
Description
Description-Separate-1This example will walk you through hosting a web application securely on your own network using the NI Web Server.
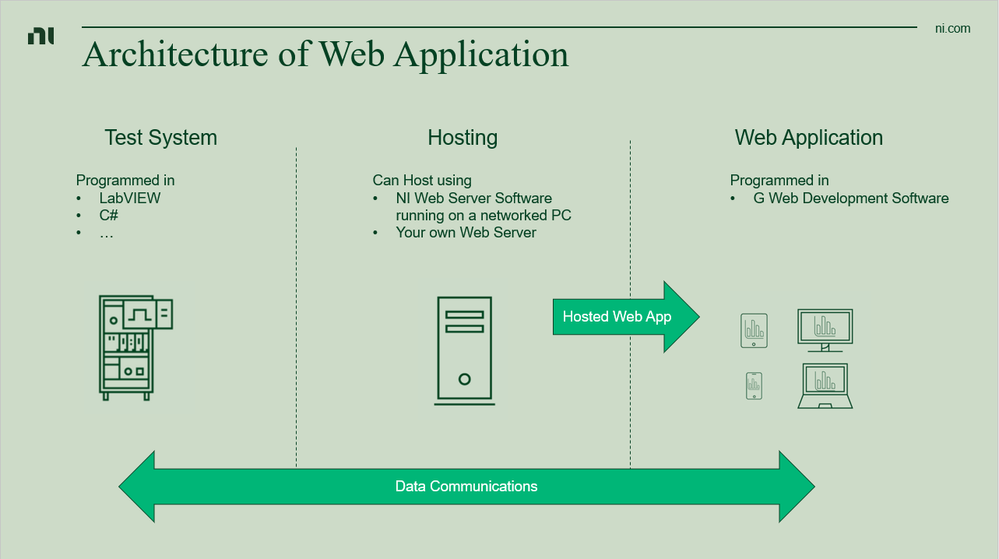
Hosting your web application is one piece of an overall web application architecture as pictured below.
The software used in this example includes
- LabVIEW 2019
- LabVIEW SystemLink Toolkit (installs with G Web Development Software)
- G Web Development Software 2022 Q3
- SystemLink API (installs with G Web Development Software)
- NI Web Server (installs with G Web Development Software)
Description-Separate-2
How to Use
How-Separate-1There are several server configuration presets you can use for the NI Web Server. We recommend starting with “Simple local access” while developing your web application and then moving on to one of the other configurations once you’ve verified your web application is working correctly.
Simple Local Access
Simple local access will only allow access to the NI Web Server, and applications hosted on the NI Web Server, from that local PC. Other machines on the local area network will not be able to connect to the server.
Step 1: Configure the NI Web Server
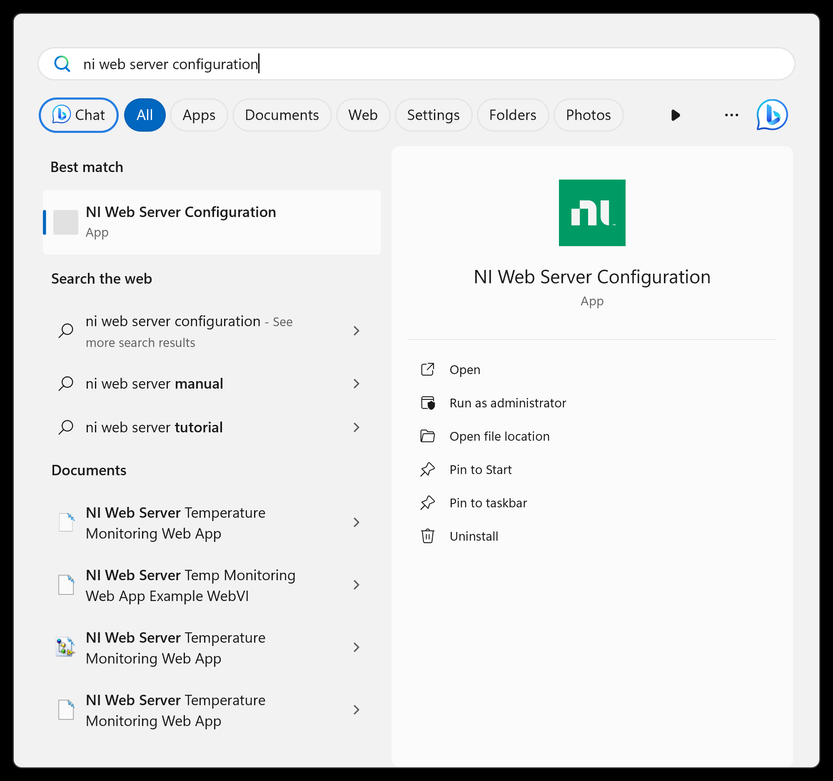
- Open the NI Web Server by searching for “NI Web Server Configuration” in your Windows search bar.
- Enter the NI Web Server Guided Setup wizard
- If opening the NI Web Server Configuration tool for the first time, it will automatically start you in the guided setup wizard.
- If the NI Web Server has already been configured, go to the Summary tab then select Run guided setup to select preset settings to run the wizard again.
- Select Simple Local Access. Press Next.
- Select which authentication providers you would like to use. Use this page in the NI Web Server manual to help you choose. The quickest way to get started is to only setup an admin account. Once selected, press Next.
- Select which HTTP port to use. The default port is 80, but can be changed based on your needs. Once selected, press Next.
- Configuration is complete. Press Finish to apply the configuration.
Step 2: Decide Permission Levels for SystemLink Tags and Messages
SystemLink Tags and Messages have multiple permission levels available in order to restrict access to different users if needed.
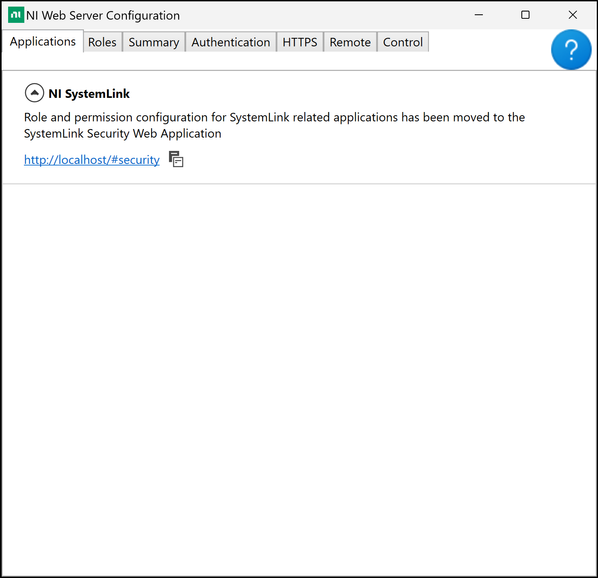
Role and permission configuration for SystemLink related applications has been moved to the SystemLink Security Web Application. You can access it using the link in the Applications tab of the NI Web Server Configuration tool.

The Username and Password used to sign into the application at the Open Configuration Node will determine the level of access to SystemLink Tags and Messages in that application. For example, if the permission level for “Read Current Tag Values and Properties” is set to Admin, the Admin username and password will be required at the Open Configuration Node upon start of the application. If a user role’s username and password is used for the Open Configuration Node upon start of the application, that application will not be able to read Tag values and properties.
Keeping these permissions in mind when setting up the NI Web Server and when deploying your applications is important.
For more information about how to use SystemLink Tags and Messages, see the SystemLink Manual.
Step 3: Point your Existing LabVIEW Application to the NI Web Server
- Open your LabVIEW application’s block diagram. In this tutorial, we are referencing the example included on this page, which is using the SystemLink API for the data communication layer.
- Locate the Open Configuration node in the block diagram
- Make sure the Open Configuration node is set to use the HTTP configuration
- The required inputs are
- Server URL: found on the Summary tab of the NI Web Server Configuration menu
- Username: one of the usernames for the accounts that were configured to access the NI Web Server. This was determined during setup of the NI Web Server in previous steps.
- Password: the corresponding password for the account and username chosen. This password was chosen during previous steps during setup of the NI Web Server
- In the example for this tutorial we use string controls for password input. Read the Security in NI Web Technology whitepaper “Hosting Authentication Credentials Securely” section for more information.
- With the correct Server URL and Credentials input into the Open Configuration node, we can now run the VI and see if the SystemLink Tags are being written to correctly on the NI Web Server
- Run the VI writing to the SystemLink Tags.
- Open and log into the NI Web Server login page by using either method
- Using the Running Server URL found on the Summary tab of the NI Web Server Configuration tool
- Typing the address into a web browser, http://localhost:port (port is only needed if the default port 80 is not used)
- Open the Tag Viewer and ensure the tags you are writing to are updating correctly
Step 4: Modify, Build, and Deploy your WebVI to the NI Web Server
- Open your WebVI in G Web Development Software and go the Diagram. Find the Open Configuration node in the WebVI's Diagram.
- Make sure the configuration for the node is set to User. You can find this setting by selecting the Open Configuration node and looking at the Item Pane on the right side of the development environment
- Create constants for the Server URL, Username, and Password inputs. Depending on your SystemLink Tag and Messages permission settings you will either keep those constants blank or require the user to input required credentials through controls on the Panel. For tips on how to handle your credentials securely, read the Security in NI Web Technology whitepaper “Hosting Authentication Credentials Securely” section for more information.
- There are three different ways you can handle Username and Password inputs for your WebVI while hosting your WebVI on the NI Web Server
- Simple Text Input (Shown in the attached example) [Simple Difficulty]
- Create controls to input Username and Password. Use the Masked Input Control to hide the Password. This is simple to implement, but requires the user to input their credentials every time the WebVI is opened.
- Rely on the NI Web Server Login System [Medium Difficulty]
- In this approach you do not ask for a username and password on the front panel, but instead rely on the NI Web Server Login system. In the WebVI you keep empty constants wired to the Server URL, User Name, and Password inputs. In your WebVI you attempt to read the Tags or Messages like normal, but if an error occurs you notify the user that they need to login at the NI Web Server login page. You would then point them to the Running Server URL listed on the NI Web Server Configuration>> Summary tab where they would login. After they login they would have to reload the WebVI. The Tags and Messages will then run correctly because the user has logged in. This has the benefits of using the already built NI Web Server login, but involves the user going back and forth between pages.
- Make a Plugin for the NI Web Server [Hard Difficulty]
- This method will result in all users logging in and accessing your WebVI(s) through the NI Web Server. The benefits of doing this are a centralized place to access WebVIs for users and the ability for admins to control access to not just Tags and Messages, but also to WebVIs based on a user’s login credentials. Follow these instructions on Github to create this plugin.
- Simple Text Input (Shown in the attached example) [Simple Difficulty]
- Once your modifications are complete, run your WebVI by choosing the drop down arrow next to the run arrow to “Run in Browser”. Ensure your WebVI is working as expected.
- If you run your WebVI in the editor, and not using “Run in Browser”, be aware that if you are using the NI Web Server Login System or making a Plugin for the NI Web Server in order to login to the server, the login will not work. These login methods rely on page navigation to the login page and back to the WebVI. While running in the editor you can not visit other web pages like the login page.
- For best results while running your WebVI in the G Web Development Software environment, ensure that you have selected the NI Web Server in theG Web Development Software Web Server Hosting Preferences. This way you’ll be running your WebVI on the NI Web Server where it will act just like it will once deployed. To access these preferences go to File >> Preferences >> Web Server. The default setting is to run WebVIs on the NI Web Server.
- The WebVI is now ready to build
- First, make sure you do not have any credentials saved in your WebVI before building.
- In the Project pane on the left side of the G Web Development Software development environment, right click the gcomp and select Create Package/installer with item.
- Once the lvdist is open, set the Output Type to Package. This setting can be found in the document pane.
- In the main editor window, set the Maintainer and Contact email appropriately.
- Press the hammer icon to start the build.
- Once the build is complete, select Locate directory in File Explorer in order to see the package built.
- Open and log into the NI Web Server login page as you did earlier. Go to the Web Applications page and click the Import button.
- Browse to the package file and upload it.
- Your WebVI is now hosted on the NI Web Server.
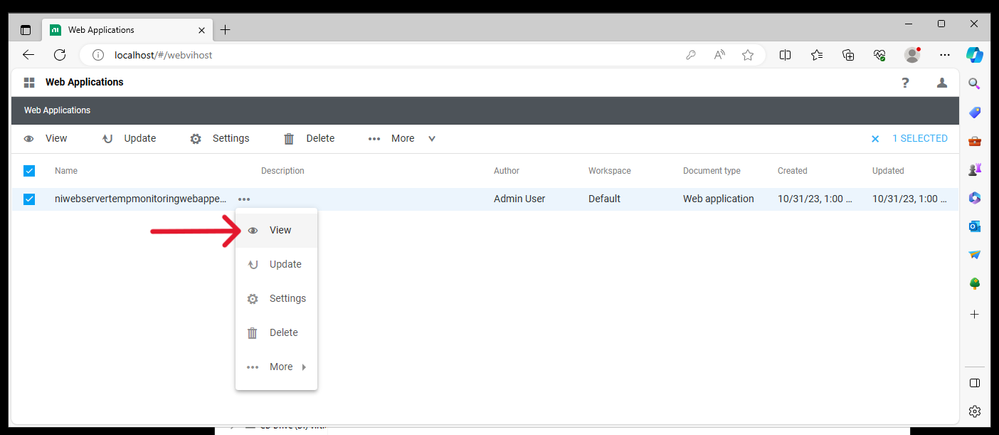
To view your WebVI, select View from the drop-down menu.
Secure Remote Access
Now that you have successfully tested your WebVI hosted on the NI Web Server using the Simple Local Access configuration, I recommend proceeding with one of the other NI Web Server security configurations. Either of the Remote Access configurations will allow other computers on your local area network to access the NI Web Server and the WebVI hosted on it. Insecure Remote Access does not encrypt traffic, such as data, user names, and passwords, when communicating between a WebVI and the NI Web Server. Secure Remote Access will have clients connect securely to the server using HTTPS after creating and importing a certificate to each of the clients. It is recommended that Secure Remote Access is enabled to allow for safe communication between WebVIs and the NI Web Server. This next section will guide you through setting up the NI Web Server using Secure Remote Access.
Step 5: Re-configure the NI Web Server
- Open the NI Web Server by searching for “NI Web Server Configuration” in your Windows search bar.
- Enter the NI Web Server Guided Setup wizard
- If opening the NI Web Server Configuration tool for the first time, it will automatically start you in the guided setup wizard.
- If the NI Web Server has already been configured, go to the Summary tab then select Run guided setup to select preset settings to run the wizard again.
- Select Secure Remote Access. Press Next.
- Select which authentication providers you would like to use. Use this page in the NI Web Server manual to help you choose. Once selected, press Next.
- Now we will need to decide what certificate to create and use. Go to the HTTPS Tab and select which HTTPS certificate method to use with the help of this page in the NI Web Server manual. Once this is selected, press Next.
- There are several options to create a certificate. It is recommended that you use a certificate from a certification authority. This will give you the most secure option and will provide the best user experience, as most browsers and applications will trust the certificate automatically.
- If you are unable to use a certificate from a certificate authority you can use a self-signed certificate. In the rest of this example, we are using a self-signed certificate.
- Press Next.
- Configuration is complete. Press Finish to apply the configuration.
- In order for clients on your network to access the NI Web Server and your WebVI, you will have to export and install your certificate onto your client machines.
- If you are using a certificate from a certification authority you should ask your IT administrator to help you export and install that certificate onto your clients
- If you are using a self-signed certificate, you can use these general instructions
- Note that the NI Web Server Configuration tool will install the certificate on the server machine.
- Export your Certificate by going to the HTTPS tab, expanding the drop down and choosing Export root certificate. Securely transfer the root certificate onto your other client machines.
- Install the root certificate onto the client machine. The instructions for doing so are different for every Client. Search for instructions on how to import self-signed certificates onto your specific client. For Windows 10, you can use the Certmgr tool, as found in these instructions. Import your certificate under the Trusted Root Certification Authorities folder.
Step 6: Modify your LabVIEW Application to point to the NI Web Server
- Change the Server URL input for the SystemLink Open Configuration node from http:// to https:// and “localhost” to the current host name or host IP address. To find the host name you can use the NI Web Server Configuration and go to the Summary tab.
- Unless your user credentials have changed, those inputs can remain the same.
- You will also need to point the Open Configuration node to your certificate location. Create a constant from the ca certificate file input and place the file location into the constant. Right-click the constant and choose “Browse for Path” to use the File Explorer to locate your certificate.
Step 7: Modify your WebVI to point to the NI Web Server
- In G Web Development Software, change the server url constant on the diagram of index.gviweb to the same host name.
- Build the package again.
- Import the new package to the Web Applications section of your NI Web Server.
Step 8: Access your WebVI
- Once the certificates have been deployed to your client, try accessing the WebVI as you did in Step 4.
- If using a Self-Signed Certificate, and you imported the certificate correctly to your client, your web browser and allow access to the WebVI with no warnings. This does depend on the specific web browser. For example, you will have to configure Firefox manually to use the certificate.
- If you can’t install the certificate on the client to enable trust, you will likely see a warning telling you the connection is not secure in your browser. It is recommended that you not ignore these warnings.
Your WebVI is now hosted securely on the NI Web Server!
General Troubleshooting
If you have trouble connecting to your WebVI, try using the IP Address of the server instead of the host name. You can also try accessing your NI Web Server login page (https://[host name or IP address]/) to verify you can connect to the server. If you still can’t access your WebVI or the NI Web Server, try these approaches
- Verify you have imported the certificate correctly
- Check your Firewall settings. Make sure the NI Web Server is approved in the list of allowed applications.
- Try a different network to check and make sure your network isn’t automatically blocking connections.
How-Separate-2
Software Product Marketing - Data Management & LabVIEW
National Instruments
Example code from the Example Code Exchange in the NI Community is licensed with the MIT license.
- Mark as Read
- Mark as New
- Bookmark
- Permalink
- Report to a Moderator
It's my understanding from reading this that you don't need Systemlink Server installed to be able to do this. Or do you? It's not listed under the Software list at the top of the page.
When we did Step 2 , it simply showed:
Is Systemlink Server required to do this?
Certified LabVIEW Architect and LabVIEW Champion
DQMH Trusted Advisor
https://wiredinsoftware.com.au


