NI myDAQ Box Contents
When you open the box, you'll see the following items:
-
The NI myDAQ Quick Start Guide . It contains additional information about various device connections not found in this document, as well as a quick measurement example to get you up and running.
-
A tray containing the following items:
-
NI myDAQ Student Data Acquisition Device
-
NI myDAQ Software Suite DVD
-
USB Cable
-
Screw-Terminal Connector
-
Digital Multimeter (DMM) Probes
-
3.5 mm Audio Cable
-
NI Screwdriver

Figure 1. NI myDAQ Quick Start Guide

Figure 2. Contents of NI myDAQ Box
Keep the tray and box to store your NI myDAQ and accessories. You also can store a breadboard and other accessories on the right side of the tray. You'll need all these items to get set up.
Software Installation

You can install the necessary software from the media that shipped with your myDAQ, or from ni.com/downloads.
-
If you are using the software installation media—Simply insert the media in your computer and follow the onscreen instructions. Note that the installation process may take from 20 to 40 minutes.
-
If you are downloading your software—Go to the following pages to download the necessary installers. Be sure to install application software, such as LabVIEW, first, then install your ELVISmx driver software.
Note: Using NI ELVIS, too? For software version and operating system support for the NI ELVISmx hardware driver, consult the NI ELVISmx Readme, available on the software media shipped with your device or on the NI ELVISmx software download page.
Hardware Setup
After the software installation is complete, you can set up your NI myDAQ hardware.
-
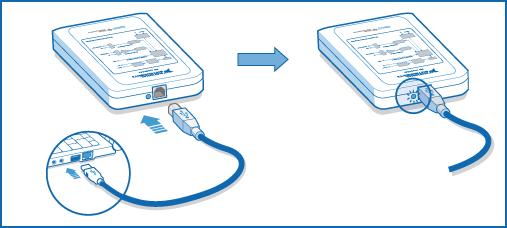
Connect one end of the USB cable to your NI myDAQ and the other end to the computer.
-
Confirm the blue LED lights up to indicate that the device is being powered.
If the light does not illuminate, refer to the Troubleshoot your NI myDAQ article for more information on possible causes and solutions.
Choose Your Software Instrument with NI ELVISmx Instrument Launcher

What is the ELVISmx Instrument Launcher?
The ELVISmx offers several virtual instruments, which are computer-based versions of some of the more commonly used laboratory instruments. NI ELVISmx is also shared with NI ELVIS , a prototyping platform for circuits and electronics.
Why does it appear?
The ELVISmx Instrument Launcher helps you get started taking measurements easily. It provides some of the most common functions you can perform with your myDAQ.
The ELVISmx Instrument Launcher should automatically appear after you connect your hardware. If the ELVISmx Instrument Launcher does not appear, refer to the Troubleshoot your NI myDAQ article for more information on possible causes and solutions. You can also manually launch the ELVISmx Instrument Launcher by selecting Start»All Programs»National Instruments»NI ELVISmx for NI ELVIS & NI myDAQ»NI ELVISmx Instrument Launcher.