Installation
- Install Java (Java SE 6 or greater is recommended).
- C & C++ Development Tools for NI Linux Real-Time 2017, Eclipse Edition is a 32-bit application. Regardless your Windows OS bit version, Java SE's bitness must match the bitness of Eclipse application.
- Install C/C++ Development Tools for NI Linux Real-Time, Eclipse Edition.
For LabVIEW 2014 to LabVIEW 2016, install C/C++ Development Tools for NI Linux Real-Time, Eclipse Edition 2014-2016.
For LabVIEW 2017 and LabVIEW 2018, install C/C++ Development Tools for NI Linux Real-Time, Eclipse Edition 2017-2018.
Configuring C/C++ Development Tools for NI Linux Real-Time, Eclipse Edition, for First Use
Complete the following steps to configure C/C++ Development Tools for NI Linux Real-Time, Eclipse Edition, for first use:
- Launch C/C++ Development Tools for NI Linux Real-Time, Eclipse Edition.
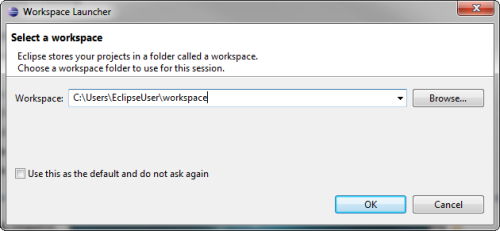
- When prompted, select a folder in which to store Eclipse projects and click OK.
 | Tip | Enable Use this as the default and do not ask again to save a project folder as your default workspace. |
- In the Eclipse welcome screen, select the Workbench icon on the far right to open the workbench view.

- C/C++ Development Tools for NI Linux Real-Time, Eclipse Edition, highlight the active perspective on the perspectives bar, as shown in the following image. The first time you use C/C++ Development Tools for NI Linux Real-Time, Eclipse Edition, the workbench view opens in the C/C++ perspective.
In the next section of this tutorial, you create a new project in the C/C++ perspective.
Creating a C/C++ Project
Complete the following steps to create a C or C++ project in C/C++ Development Tools for NI Linux Real-Time, Eclipse Edition:
- Switch to the C/C++ perspective.
- Select File»New»Project to open the New Project Wizard.
- Expand the C/C++ folder and select C Project or C++ Project depending on the programming language you want to use.
- Click Next to open the C Project page.
- Enter a project name in the Project name text box.
- Select Hello World ANSI Project under the Executable folder in the Project type listbox.
 | Note This tutorial uses the Hello Word ANSI Project for instructional purposes. You can select any project type that fits your needs. |
- Select Cross GCC in the Toolchains listbox to enable cross-compilation, which configures the compiler to create executable code for embedded systems, such as your NI Linux Real-Time target.
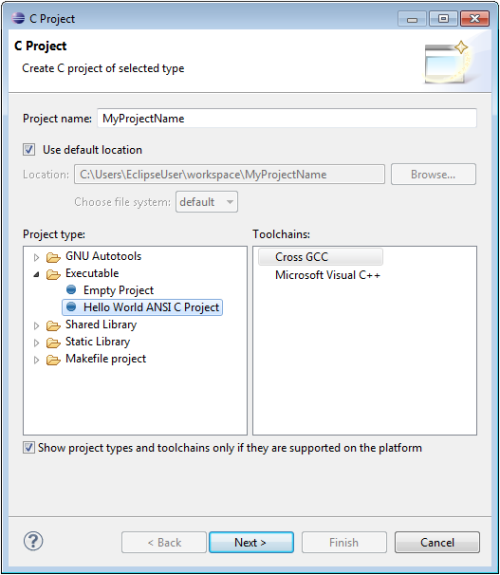
- Click Next to open the Basic Settings page.
- Enter the basic properties of your project in the Author, Copyright notice, Hello world greeting, and Source text boxes.
| Note The Source text box specifies the directory on your development computer hard drive where you store the project source code. |
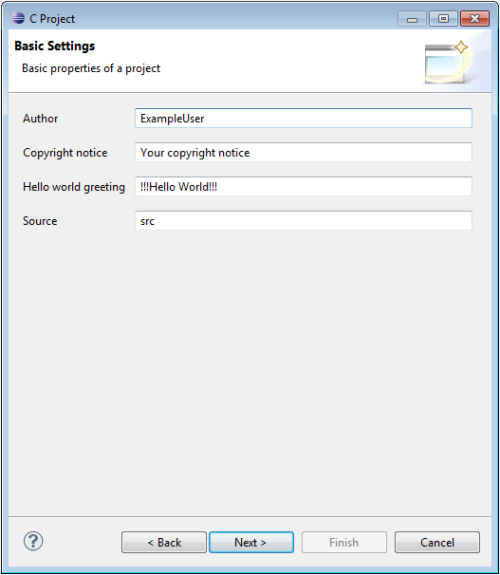
- Click Next to open the Select Configurations page.
- Enable Debug to configure the project to allow debugging your executable, and/or enable Release to configure the project to allow building a smaller, faster executable optimized for release.
| Note For purposes of this tutorial, ensure you enable Debug. |
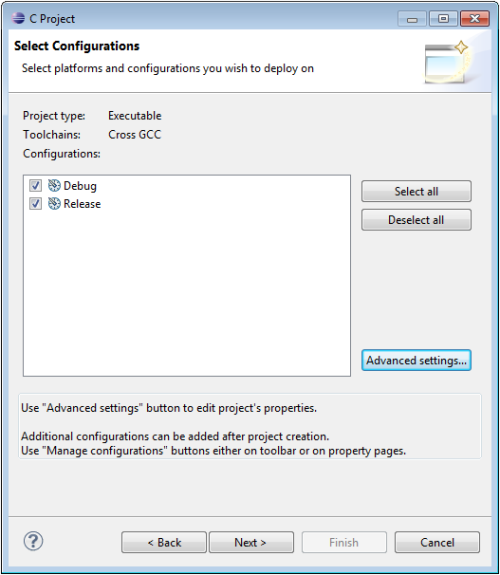
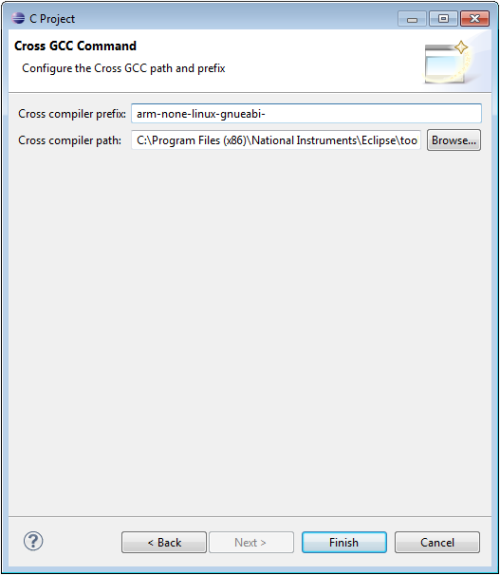
- Click Next to open the Cross GCC Command page.
- In the Cross compiler prefix text box, enter one of the values from the following list, including the hyphen (-) at the end, to specify the correct compiler for your NI Linux Real-Time target:
- (ARM-based targets, 2013 software stack) arm-none-linux-gnueabi
- (ARM-based targets, 2014 software stack) arm-nilrt-linux-gnueabi-
- (ARM-based targets, 2017 software stack) arm-nilrt-linux-gnueabi-
- (Intel x64-based targets, 2014 software stack) x86_64-nilrt-linux-
- (Intel x64-based targets, 2017 software stack) x86_64-nilrt-linux-
- In the Cross compiler path text box, browse to the location of the correct compiler for your target as specified in the following list:
- (ARM-based targets, 2013 software stack) \<National Instruments>\Eclipse\toolchain\gcc-4.4-arm\i386\bin
- (ARM-based targets, 2014 software stack) \<National Instruments>\Eclipse\14.0\arm\sysroots\i686-nilrtsdk-mingw32\usr\bin\armv7a-vfp-neon-nilrt-linux-gnueabi
- (ARM-based targets, 2017 software stack) C:\build\17.0\arm\sysroots\i686-nilrtsdk-mingw32\usr\bin\arm-nilrt-linux-gnueabi
- (Intel x64-based targets, 2014 software stack) \<National Instruments>\Eclipse\14.0\x64\sysroots\i686-nilrtsdk-mingw32\usr\bin\x86_64-nilrt-linux
- (Intel x64-based targets, 2017 software stack) C:\build\17.0\x64\sysroots\i686-nilrtsdk-mingw32\usr\bin\x86_64-nilrt-linux
- Click Finish to create your project and return to the workbench view.
In the next section of this tutorial, you create an executable build of your project to enable it to run.
Creating a Build of a C/C++ Project
Before you can run your project, you need to test that your source code compiles by creating an executable build of your project. Complete the following steps to create an executable build of a C/C++ project:
- Switch to the C/C++ perspective.
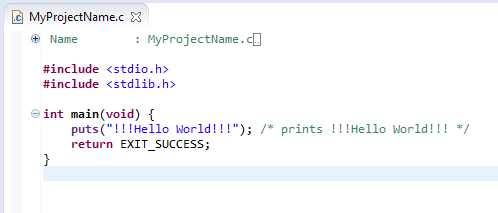
- Modify the template source code if you want to adapt the template to your application needs, or enter C/C++ code if you selected a blank project. For purposes of this tutorial, you do not need to make changes to the Hello Word ANSI Project source code.
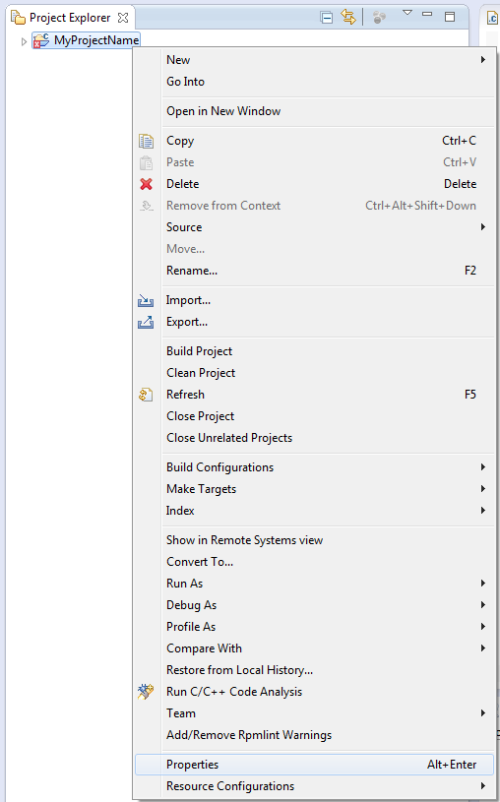
- Right-click your project in the Project Explorer tab and select Properties.
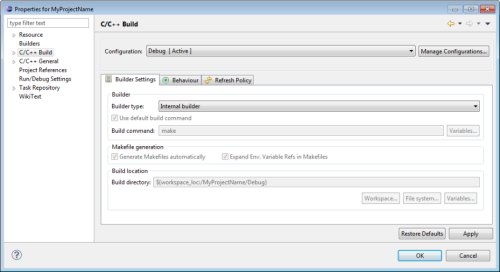
- Select C/C++ Build in the left pane of the Properties dialog box.
- Select Internal builder from the Builder type pull-down menu for the Debug configuration. Selecting the internal builder uses C/C++ Development Tools for NI Linux Real-Time, Eclipse Edition (instead of an external build file) to build the executable.
| Note For purposes of this tutorial, you work only with the Debug configuration, but this section also applies to the Release configuration. |
- Select Settings under C/C++ Build in the left pane of the Properties dialog box.
- Select Miscellaneous under Cross GCC Compiler in the Tool Settings tab.
- (ARM-based targets) Add a space after the existing text in the Other flags text box, and then enter -mfpu=vfpv3 -mfloat-abi=softfp. This step improves the performance of floating-point operations.
- (2017 software stack) Complete the following steps to specify the path to the sysroot, which is the logical root directory for headers and libraries. You need to specify the path to the sysroot to properly compile and link an application.
- In the Other flags text box, add a space after the existing text, and then enter one of the values from the following list:
- (ARM-based targets, 2017 software stack) --sysroot=C:\build\17.0\arm\sysroots\cortexa9-vfpv3-nilrt-linux-gnueabi
- (Intel x64-based targets, 2017 software stack) --sysroot=C:\build\17.0\x64\sysroots\core2-64-nilrt-linux
- Select Miscellaneous under Cross GCC Linker in the Tool Settings tab.
- In the Linker flags text box, enter one of the values from the following list:
- (ARM-based targets, 2017 software stack) --sysroot=C:\build\17.0\arm\sysroots\cortexa9-vfpv3-nilrt-linux-gnueabi
- (Intel x64-based targets, 2017 software stack) --sysroot=C:\build\17.0\x64\sysroots\core2-64-nilrt-linux
- (2017 software stack) To remove semantic errors from included header classes it is necessary to include directories in C/C++ General under Paths and Symbols, GNU C or GNU C++. For the C++ getting started example, the following directories must be included in GNU C++.
- (ARM-based targets, 2017 software stack)
- C:\build\17.0\arm\sysroots\cortexa9-vfpv3-nilrt-linux-gnueabi\usr\include\c++\4.9.2\
- C:\build\17.0\arm\sysroots\cortexa9-vfpv3-nilrt-linux-gnueabi\usr\include\c++\4.9.2\arm-nilrt-linux-gnueabi
- C:\build\17.0\arm\sysroots\cortexa9-vfpv3-nilrt-linux-gnueabi\usr\include
- (Intel x64-based targets, 2017 software stack)
- C:\build\17.0\x64\sysroots\core2-64-nilrt-linux\usr\include\c++\4.9.2
- C:\build\17.0\x64\sysroots\core2-64-nilrt-linux\usr\include\c++\4.9.2\x86_64-nilrt-linux
- C:\build\17.0\x64\sysroots\core2-64-nilrt-linux\usr\include
- Click Apply and then OK to close the Properties dialog box.
- Select Project » Build Project in the workbench view to create an executable of your project.
- The Console tab displays Build Finished if the build completes successfully, as shown in the following image.

| Note An error 'Program "g++" not found in PATH' or 'Program "gcc" not found in PATH" may appear in the Problems tab during the build even though the build is successful. These errors can be safely ignored and removed by Right-Clicking the error and selecting Delete. |
In the next section of this tutorial, you prepare to run the executable on your NI Linux Real-Time target by adding your target to the project.
Configuring a Remote System
Before you can run the executable you created in the previous section on your NI Linux Real-Time target, you need to add your target to the project. Complete the following steps to configure your target as a remote system in C/C++ Development Tools for NI Linux Real-Time, Eclipse Edition:
| Note Before proceeding with the steps in this section, ensure your target has secure shell (SSH) enabled. You can enable SSH on your target using Measurement & Automation Explorer (MAX) or using a DIP switch on your target (if available). |
- Select Window » Open Perspective » Other to open the Open Perspective dialog box.
- Select Remote System Explorer.
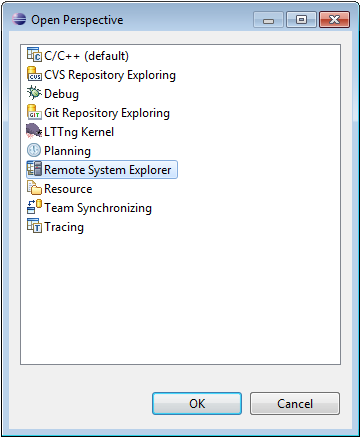
- Click OK to add the Remote System Explorer perspective to the workbench.
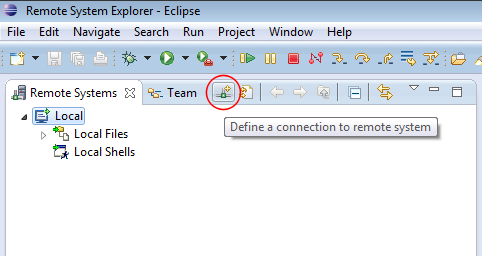
- Click the Define a connection to remote system button, circled in the following image, to open the New Connection wizard.
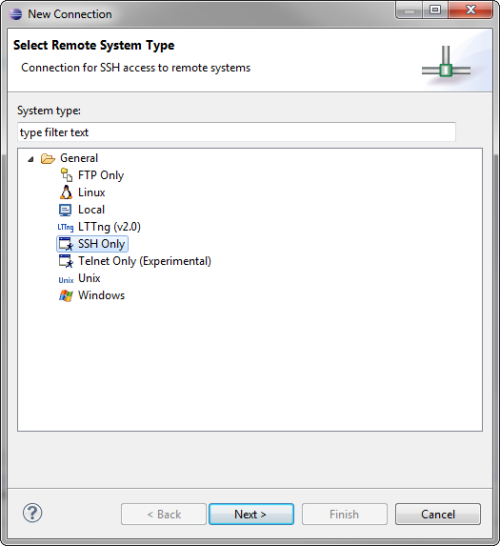
- Select SSH Only under the General folder.
| Note You also can select Linux as the remote system type, but since connecting to NI Linux Real-Time targets requires SSH, selecting SSH Only shortens the number of configuration steps by pre-selecting SSH options. |
- Click Next to open the Remote SSH Only System Connection page.
- Select a profile to contain the remote system connection from the Parent profile pull-down menu. For information about profiles, refer to the Remote System Explorer Profiles topic of the C/C++ Development Tools for NI Linux Real-Time, Eclipse Edition Help, available by selecting Help » Help Contents from the workbench view.
- Enter the hostname or IP address of your NI Linux Real-Time target in the Host name text box.
| Tip You can use MAX to identify your target's hostname and IP address. |
- (Optional) Enter a description or change the connection name in the Description and Connection name text boxes to help you identify your target when it appears in the Remote System Explorer perspective.
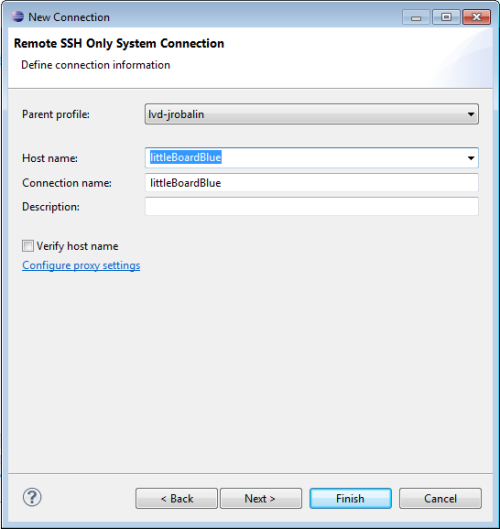
- Click Finish.
- Your target displays in the Remote Systems tab in the Remote System Explorer perspective, as shown in the following image.
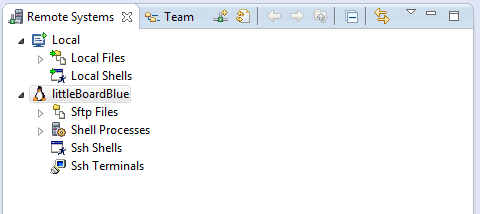
- Expand the Sftp Files folder under your target to explore the files on your target.
- When prompted, enter the user name and password assigned to your target and click OK. The default user name is admin and the default password is a blank password.
| Note NI recommends you set a password for improved security. For information on setting a password, refer to the Logging in to your System topic of the Measurement & Automation Explorer Help, available by selecting Help » MAX Help from MAX. |
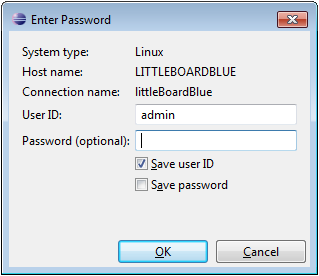
| Note If the connection pop-up does not include a User ID field, please right-click on your target under the Remote Systems tab and click Properties. You can update the User ID input by changing the Default User ID option in the Host category. |
With a successful logon, you establish an SSH connection to your target and enable transferring files to it. In the next section of this tutorial, you copy and run a C/C++ executable on your target.
Running a C/C++ Executable on Your NI Linux Real-Time Target
At this point in the tutorial, your project contains a target and an executable. Complete the following steps to run your C/C++ executable on your target:
- Select Run » Run Configurations to open the Run Configurations dialog box.
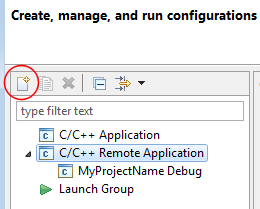
- Select C/C++ Remote Application in the left pane.
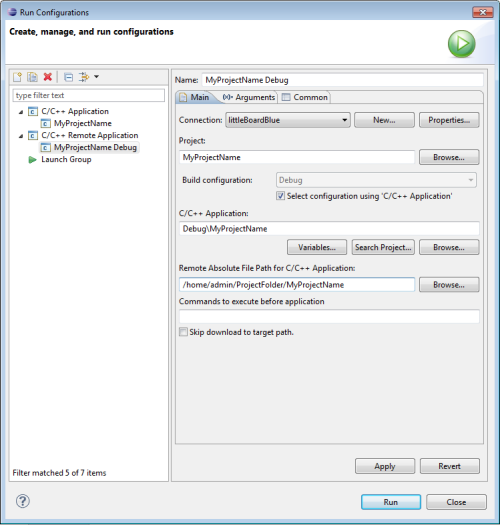
- Click the New launch configuration button, circled in the following image, to specify settings for running an executable on your target.
- Select your target from the Connection pull-down menu.
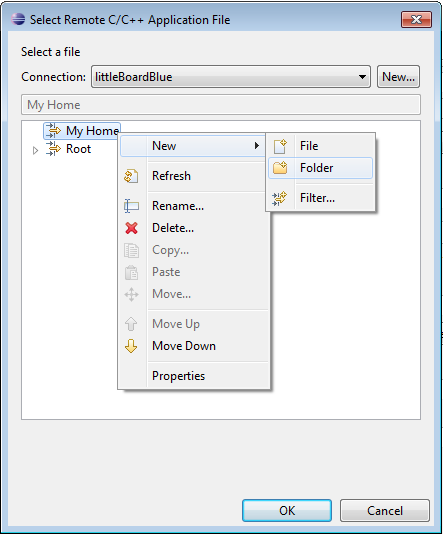
- Click the Browse button beside the Remote Absolute File Path for C/C++ Applications text box to open the Select Remote C/C++ Application File dialog box.
- Right-click the My Home directory in the listbox and select New » Folder to create a folder on the target in which to place a copy of the executable.
- Enter a name for the folder you created in the previous step in the New folder name text box.
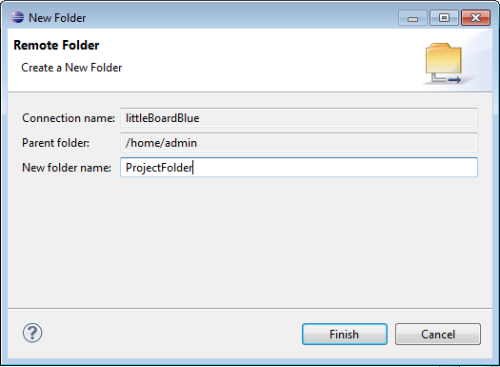
- Click Finish to return to the Run Configuration dialog box.
- Append your project name (or whatever name you wish to assign to the executable) to the file path populated in the Remote Absolute File Path for C/C++ Applications text box.
| Note This text box specifies the file path (including the executable name) on your target where the compiler copies the executable. In this example, the file path reads /home/admin/ProjectFolder/MyProjectName, where MyProjectName defines the executable name, as shown in the following image. |
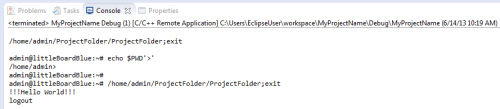
- Click Apply and then Run to copy and run the executable on your target.
- The program execution displays in the Console tab, as shown in the following image.
In the next section of this tutorial, you explore the debugging functionality available in C/C++ Development Tools for NI Linux Real-Time, Eclipse Edition.
Debugging a C/C++ Project
C/C++ Development Tools for NI Linux Real-Time, Eclipse Edition offers functionality for debugging your project. Complete the following steps to debug a C/C++ project in C/C++ Development Tools for NI Linux Real-Time, Eclipse Edition:
- Select Run » Debug Configurations to open the Debug Configurations dialog box.
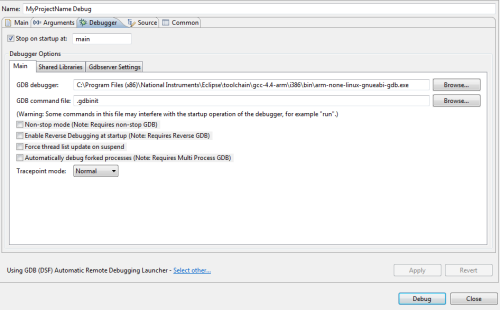
- Select the Debugger tab.
- Click the Browse button beside the GDB debugger text box.
- Select the correct debugger as specified in the following list:
- (ARM-based targets, 2013 software stack) arm-none-linux-gnueabi-gdb.exe in the <National Instruments>\Eclipse\toolchain\gcc-4.4-arm\i386\bin directory
- (ARM-based targets, 2014 software stack) arm-nilrt-linux-gnueabi-gdb.exe in the <National Instruments>\Eclipse\14.0\arm\sysroots\i686-nilrtsdk-mingw32\usr\bin\armv7a-vfp-neon-nilrt-linux-gnueabi directory
- (ARM-based targets, 2017 software stack) arm-nilrt-linux-gnueabi-gdb.exe in the c:\build\17.0\arm\sysroots\i686-nilrtsdk-mingw32\usr\bin\arm-nilrt-linux-gnueabi directory
- (Intel x64-based targets, 2014 software stack) x86_64-nilrt-linux-gdb.exe in the <National Instruments>\Eclipse\14.0\x64\sysroots\i686-nilrtsdk-mingw32\usr\bin\x86_64-nilrt-linux directory
- (Intel x64-based targets, 2017 software stack) x86_64-nilrt-linux-gdb.exe in the c:\build\17.0\x64\sysroots\i686-nilrtsdk-mingw32\usr\bin\x86_64-nilrt-linux directory
- Click Open.
- Click Apply and then Debug to start debugging the project.
- Click Yes when C/C++ Development Tools for NI Linux Real-Time, Eclipse Edition, prompts you to switch perspectives.
Exploring the Debug Perspective
- The Debug tab in the upper left displays the call stack of each running thread.
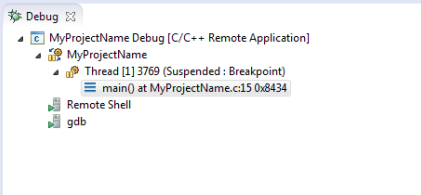
- The Variables tab in the upper right lists C/C++ variables in your source code.

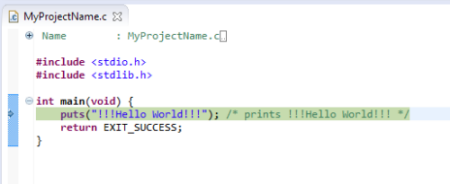
- The project tab in the center left displays source code and highlights lines as they execute.
| Tip You can hover your cursor over the source code to display detailed information about a function or variable. | |
- To add a breakpoint, highlight a line of code and select Run » Toggle Breakpoint. A breakpoint suspends the execution of a program at the location where the breakpoint is set.
Exploring the Debug Toolbar

The Debug toolbar includes the following buttons:
 | Instruction Stepping Mode | Enables instruction stepping mode to examine a program as it steps into disassembled code. |
 | Drop to Frame | Re-enters the selected stack frame in the Debug view. |
 | Use Step Filters | Enables step filters in the Debug view. |
 | Step Return | Continues execution to the end of the current routine, then follows execution to the caller of the routine. |
 | Step Over | Executes the current line, following execution inside a routine. |
 | Step Into | Executes the current line, including any routines, and proceeds to the next statement. |
 | Resume | Resumes execution of the currently suspended debug target. |
 | Suspend | Halts execution of the currently selected thread in a debug target. |
 | Terminate | Ends the selected debug session and/or process. |
 | Disconnect | Detaches the debugger from the selected process. |